Somebody has told you that metal cladding will leak. On a face-sealed wall they are right: the only thing standing between the weather and the blockwork is a gun-applied sealant bead with a service life of 10 to 15 years, wrapped around a house the client expects to hand on after sixty. On a rainscreen they are wrong, and wrong in a way worth understanding, because a rainscreen is designed to let water past the panel face. That is the system working, not failing. What keeps the house dry sits behind the panel – the joint type, the depth of the drained cavity, and how that cavity is compartmented. Villa facade waterproofing is decided in those millimetres, and the correct millimetres are not the same in Mumbai, Dubai, Singapore and the northern Emirates.
Why Villa Facade Waterproofing Became a 2026 Detail
Two things pushed villa work towards the rainscreen. The first is arithmetic. A face-sealed wall puts sealant in the primary line of defence, and a sealant joint has a realistic service life of 10 to 15 years under tropical UV and daily thermal cycling. A G+2 villa carries roughly 900 to 1,400 linear metres of external joint, so the whole elevation is on a fifteen-year clock, at height, behind a finish that has to be cut out and replaced rather than topped up. The second is that villa skins got deeper. Once an elevation carries a lapped plate, a tilted plank or a blade course – the geometry that arrives with parametric facade design in India and across the Gulf – there is a cavity behind it whether anyone designed one or not. An undesigned cavity is a trap. A designed one is the entire waterproofing strategy.
That strategy has a definition worth being precise about. A drained and back-ventilated wall accepts that water crosses the outer face, gives it a continuous route down and out at every floor, and moves enough air behind the panel to dry whatever drainage leaves behind. Two words, two separate jobs. Drained is not the same as ventilated, and in one of the four climates below the second job governs the entire facade. None of these markets lets the question be dodged in the submission drawings either: on a Dubai Municipality facade section the cavity, the barriers and the weep line are either drawn or they are not. Getting the definition wrong at concept stage is not discovered until the second wet season, by which time the sub-frame has already been paid for.
The Five Ways a Villa Rainscreen Actually Leaks
Rainscreen leaks are not random events. On villa work they fall into five paths, and only one of them is the open joint everybody worries about. The other four are the drainage line, the cavity’s ability to dry, the interfaces at heads and edges, and the sub-frame quietly corroding behind a panel that still looks new. Work out which of the five is in play before anyone proposes a remedy, because the remedy for one is the cause of another – widening a joint is the right move in Singapore and the wrong one in Dubai. The four villas below take one leak path each, in four climates, and the fifth path gets its own section afterwards because it is the same everywhere.
| Leak path | What is really going wrong |
|---|---|
| 1. The joint, under wind pressure | Water crossing an open joint is normal and designed for. It becomes a leak only when wind pressure drives it across faster than the cavity behind can carry it away – which is why one quadrant of a Mumbai villa needs a baffled joint while the rest stays open at 10 mm. |
| 2. The drainage line, silted shut | A 6 mm round weep hole closes within a season anywhere wind carries sand or dust. A blocked weep converts a drained cavity into a tank, and the panel face is still perfectly intact while it happens. |
| 3. The cavity that drains but never dries | In a humid tropical climate the cavity stays wet between downpours. Drainage was never the constraint; airflow is. Without a measurable free vent area at BOTH ends of a compartment, the cavity is drained, not back-ventilated. |
| 4. The interfaces – window heads, slab edges, parapets | Run-off with no drip groove to break it clings to the soffit by surface tension, tracks back to the wall and re-enters the cavity below the flashing. Most ‘the cladding leaks’ calls are this. |
| 5. The sub-frame, behind an intact panel | An aluminium bracket bolted straight to a steel angle is a bimetallic couple. In salt-laden coastal air it corrodes years before the panel shows anything, so the failure is invisible until a fixing lets go. |
1. Mumbai Parametric Lapped Cassette Wall: A G+2 Private Villa
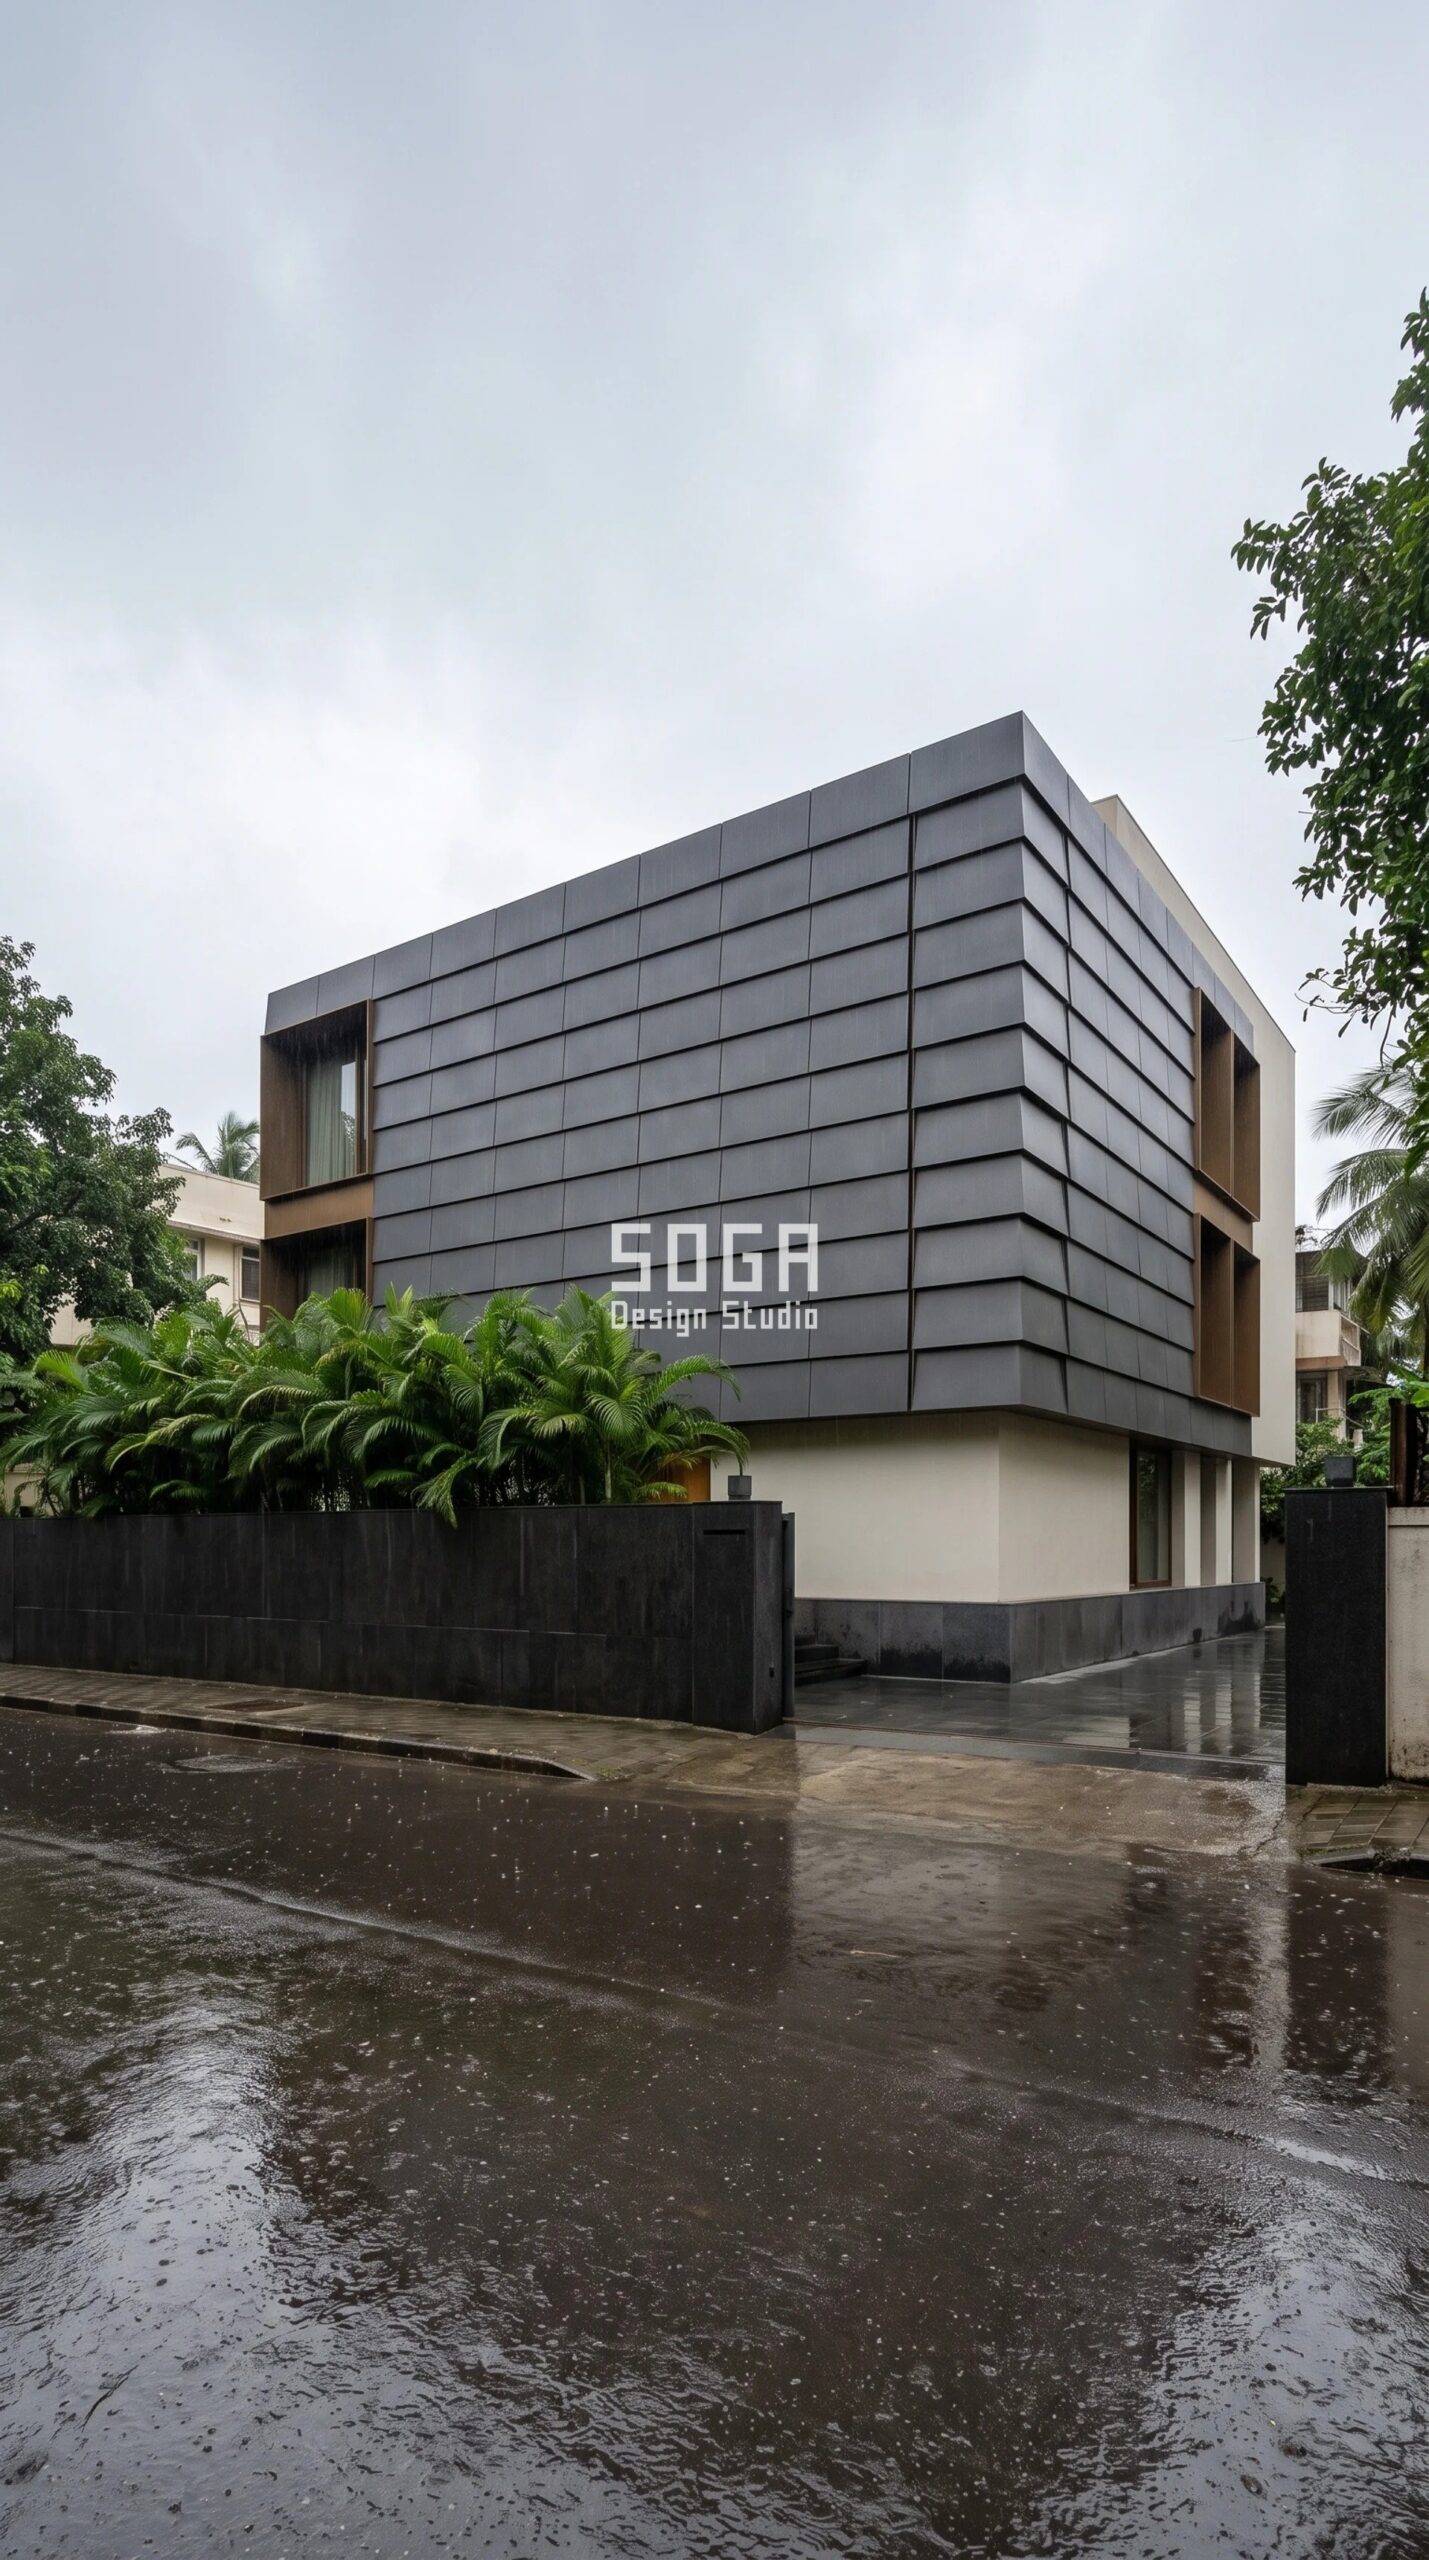
Design seed: Stepped monsoon-shaded villa massing x overlapping metal plate skin x lap-depth stepping x 3 mm solid metal plate in PVDF matte x baffled windward joint on the south-west quadrant. This G+2 Private villa in Juhu, Mumbai wears a Parametric Lapped Cassette Wall skin in 3 mm solid metal lapped cassettes in basalt-grey PVDF matte on a hot-dip galvanised MS carrier, off-white lime-plaster body, honed basalt plinth. This is leak path 1, the joint under wind pressure. Mumbai’s south-west monsoon arrives as horizontal rain against one quadrant of the house for eight weeks. On that quadrant a fully open joint is the wrong detail: wind pressure drives water through it faster than a 50 mm cavity can clear it. So the joint is baffled where the rain lands and left open everywhere else, and the lap deepens from 25 mm to 60 mm across the same gradient – the skin tightens exactly where the storm hits and stays open where it needs to breathe. The baffle strip sits 30 mm behind the face and is gasketed at every lap, so the pressure drop happens inside the joint rather than inside the cavity, and the cavity behind it is then only ever clearing a trickle. That is the same graded logic we apply to monsoon-proof cladding detailing in Mumbai generally: exposure decides the joint, not the elevation drawing. The parametric variation is written into the fabrication drawings, not sprayed on afterwards.
How the Parametric Lapped Cassette Wall is built
| Design parameter | Specification |
|---|---|
| Module | 1200 x 600 mm folded 3 mm solid metal cassette in PVDF matte with 25 mm returns, 9.8 kg each, single-person lift |
| Lap driver | Driving-rain exposure map. Course-to-course lap steps 25 mm on the sheltered north-east face to 60 mm across the south-west quadrant, in 5 mm increments – 8 discrete lap variants, no bespoke panels |
| Joint | Vertical joints open at 10 mm on north and east; on the south-west and west elevations the same joint becomes a labyrinth baffle with a 40 mm overlapping EPDM-gasketed baffle strip set 30 mm behind the face |
| Cavity + compartments | 50 mm drained and back-ventilated cavity; horizontal cavity barriers at every floor slab and vertical compartment closers within 600 mm of every external corner, where wind suction peaks |
| Drainage + drip | 10 x 30 mm slotted weeps at 450 mm centres along every compartment base; 25 mm projecting drip flashing with a continuous 10 mm drip groove over every opening head, throwing water 20 mm clear of the face |
| Sub-frame + fixings | 50 x 50 x 3 SHS hot-dip galvanised MS carrier at 80 microns, A4-316 stainless fixings throughout, EPDM isolation washer at every dissimilar-metal contact; about 460 cassettes, 0 percent unique parts |
Material & colour: hero skin in Basalt grey PVDF matte hero / warm bronze anodised lap reveal / off-white lime plaster body, kept to a restrained palette so the geometry does the talking. Indicative facade cost: Rs 1,250 – Rs 1,950 per sq ft, fully designed and installed, with an itemised estimate produced per project.
2. Dubai Parametric Tilt-Plank Array: A G+1 Private Villa
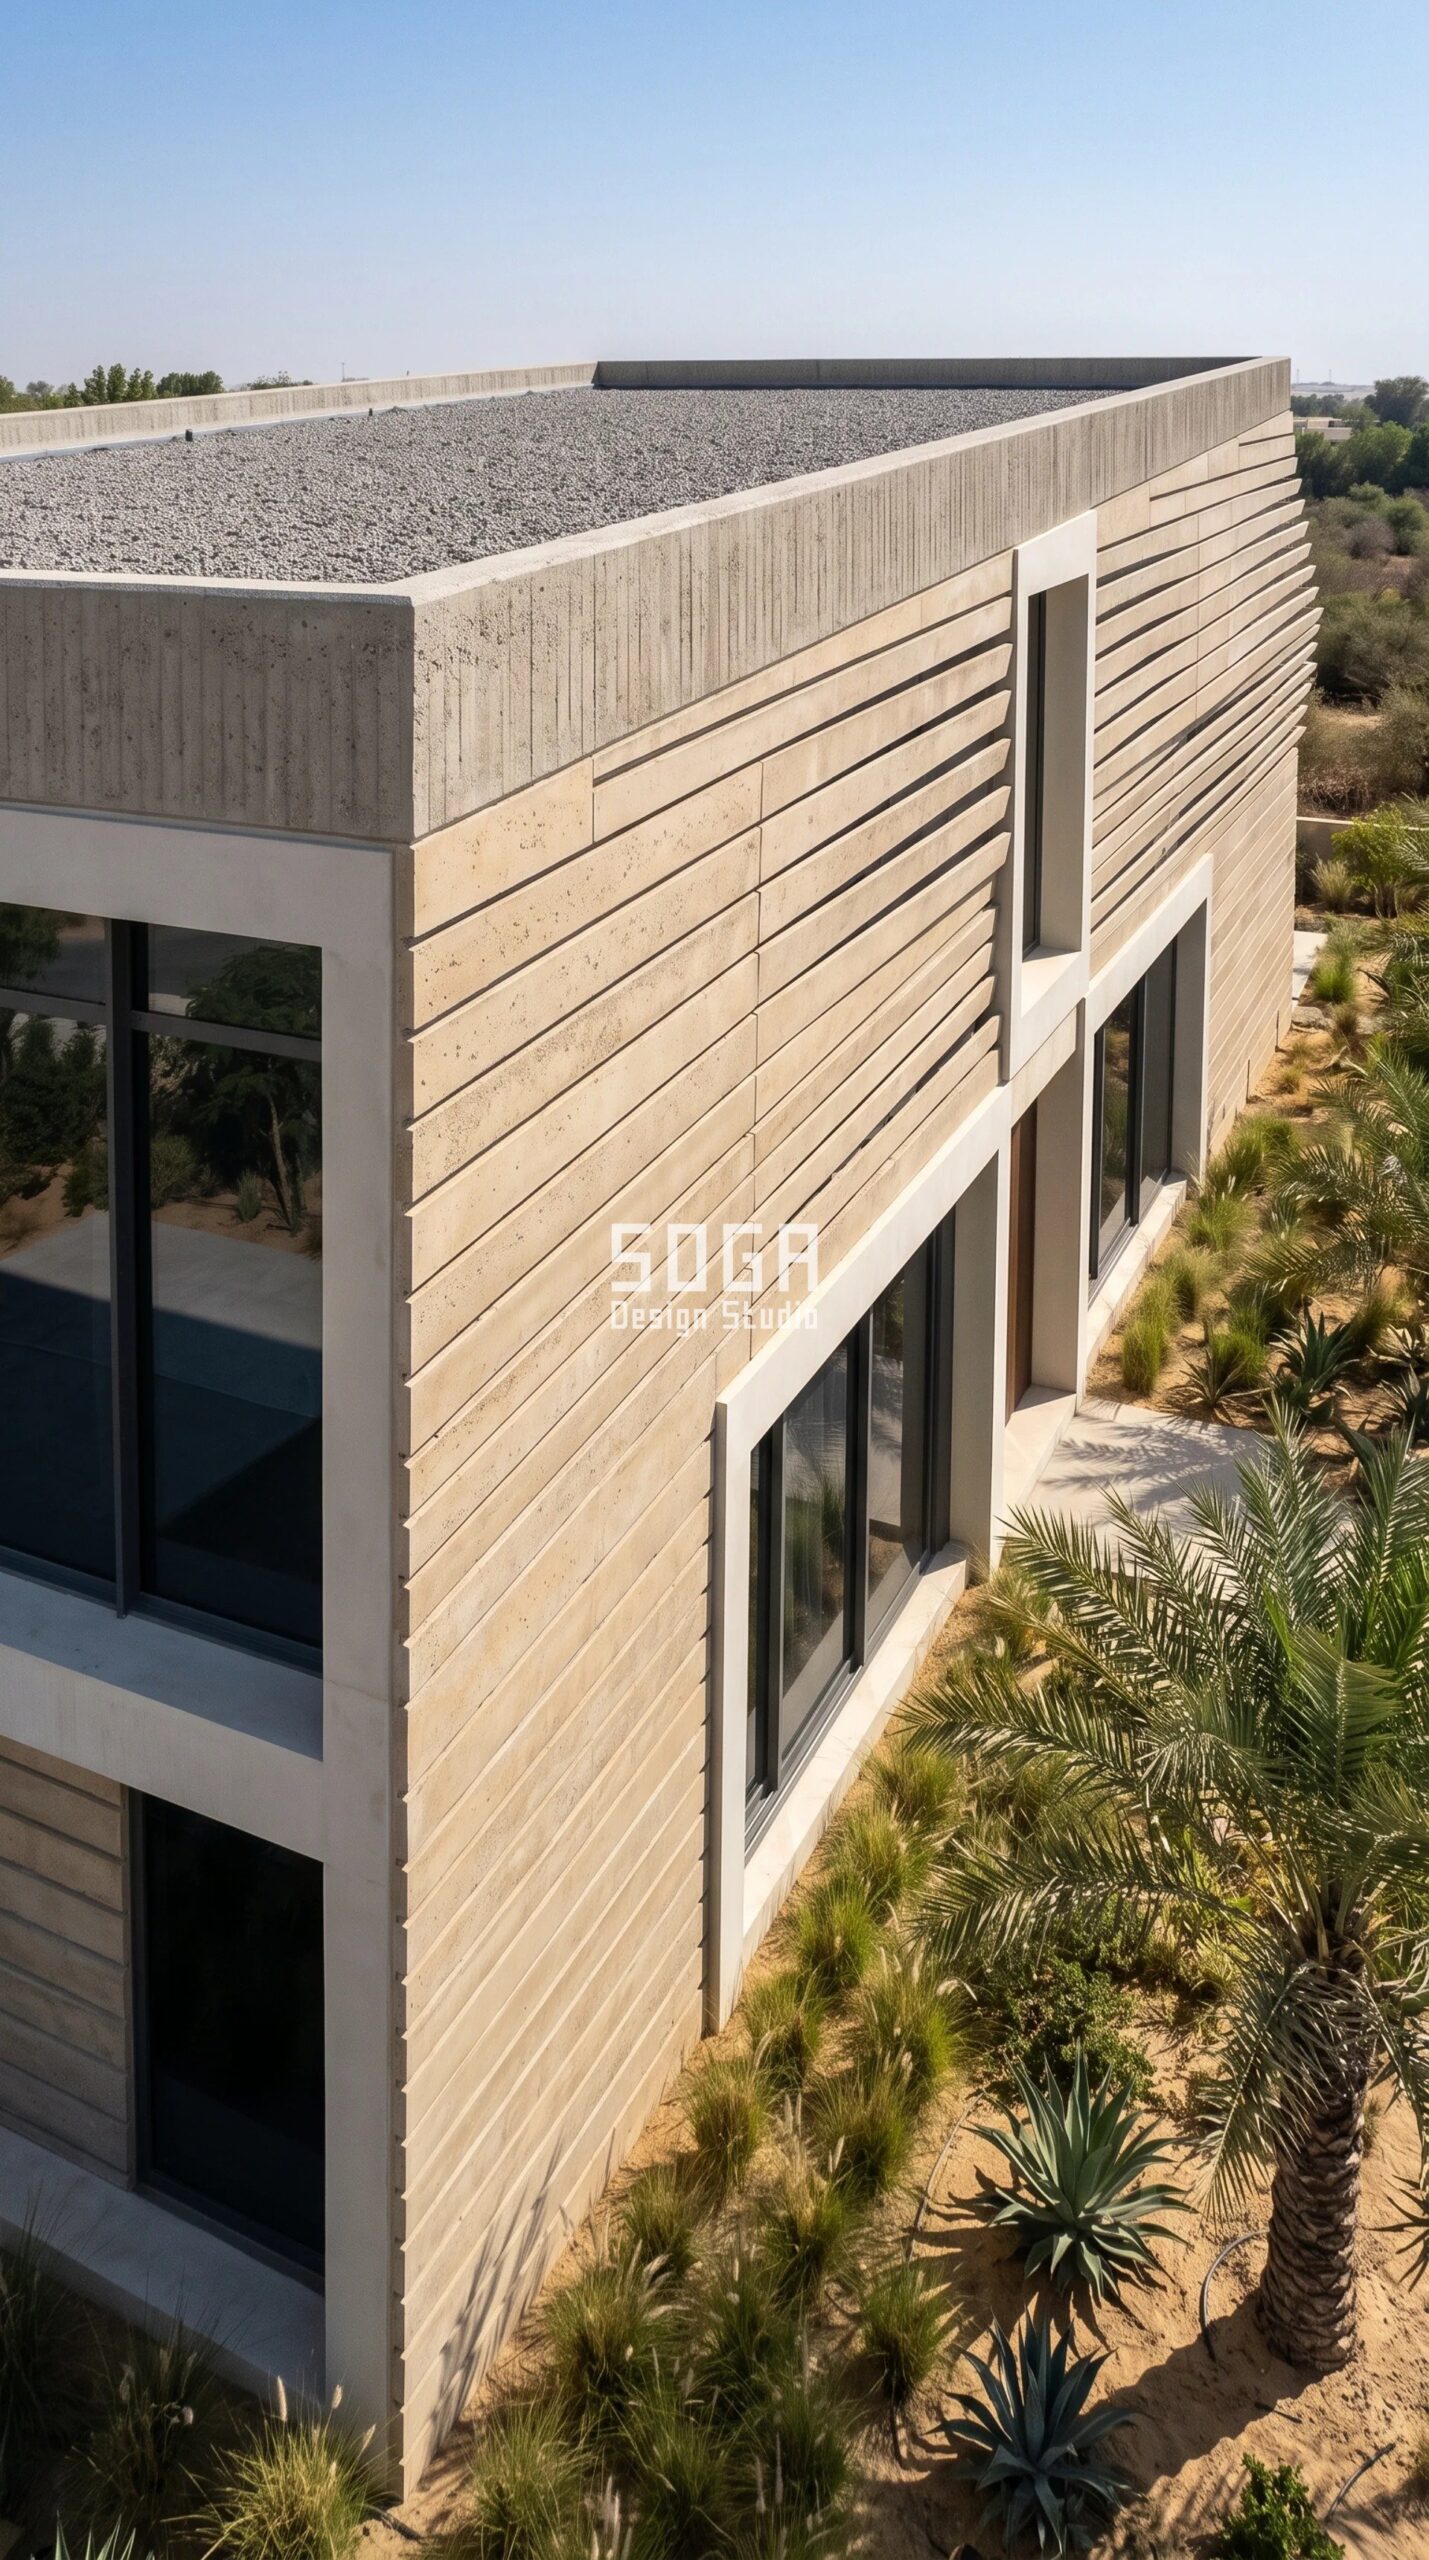
Design seed: Low horizontal villa volumes x cast-concrete plank skin x plank tilt gradation x sand-cast UHPC x sand-shedding tilt with a flushable drainage line. This G+1 Private villa in Al Barari, Dubai wears a Parametric Tilt-Plank Array skin in Sand-cast textured UHPC open-joint planks, 22 mm, on stainless helping-hand brackets and aluminium T-rails, off-white RCC body. This is leak path 2, the drainage line silting shut. Dubai gets little rain and most of it arrives in two or three violent hours, on the same wind that carries fine sand all year. The cavity fails here not from water volume but from blockage: sand enters, settles at the base, and the drainage path closes months before the rain arrives. The nose-down plank tilt sheds sand off every face, the joint is narrowed rather than widened, and the whole drainage line is sized and detailed to be flushed, not only to drain. Every weep is a 10 x 30 mm slot instead of a 6 mm hole, because a slot of that aspect ratio will not bridge over with fine dust the way a round hole does, and the base flashing lifts off in 3 m lengths so the line can be looked at with a torch and cleared with a hose at the annual service rather than assumed to be open. The parametric variation is written into the fabrication drawings, not sprayed on afterwards.
How the Parametric Tilt-Plank Array is built
| Design parameter | Specification |
|---|---|
| Module | 1500 x 300 x 22 mm sand-cast UHPC plank, 24 kg each, two-person lift; 3 moulds only – tilt is set at the bracket, not in the mould, so 7 tilt variants come off 3 castings |
| Tilt driver | Prevailing north-west shamal and summer sun altitude. Every plank tilts outward nose-down from 3 degrees on the sheltered east face to 9 degrees on the north-west, in 1 degree steps, so no plank presents an upward-facing ledge for sand to settle on |
| Joint | Horizontal open joints held to 8 mm at the base and 12 mm at the head – deliberately narrower than a temperate-climate open joint, because a wide joint in Dubai admits wind-driven sand faster than it sheds rain |
| Cavity + compartments | 40 mm drained cavity; cavity barriers at floor level and vertical closers within 900 mm of corners; 25 mm thermal break pads at every bracket |
| Drainage + flushing | 10 x 30 mm slotted weeps at 500 mm centres – a 6 mm circular weep hole silts up in one season here and is the commonest cause of a wet Dubai cavity. 1.5 mm aperture stainless sand screen at the cavity base only, never at the joint. Removable base flashing every 3 m so the cavity can be hose-flushed |
| Sub-frame + fixings | A4-316 stainless helping-hand brackets, 6063-T6 aluminium T-rails, about 520 planks from 3 moulds, 0 percent unique parts |
Material & colour: hero skin in Warm limestone-buff sand-cast UHPC / off-white concrete body / graphite glazing, kept to a restrained palette so the geometry does the talking. Indicative facade cost: AED 320 – AED 470 per sq ft, fully designed and installed, with an itemised estimate produced per project.
3. Singapore Parametric Vent-Gap Panel Screen: A G+2 Detached Bungalow
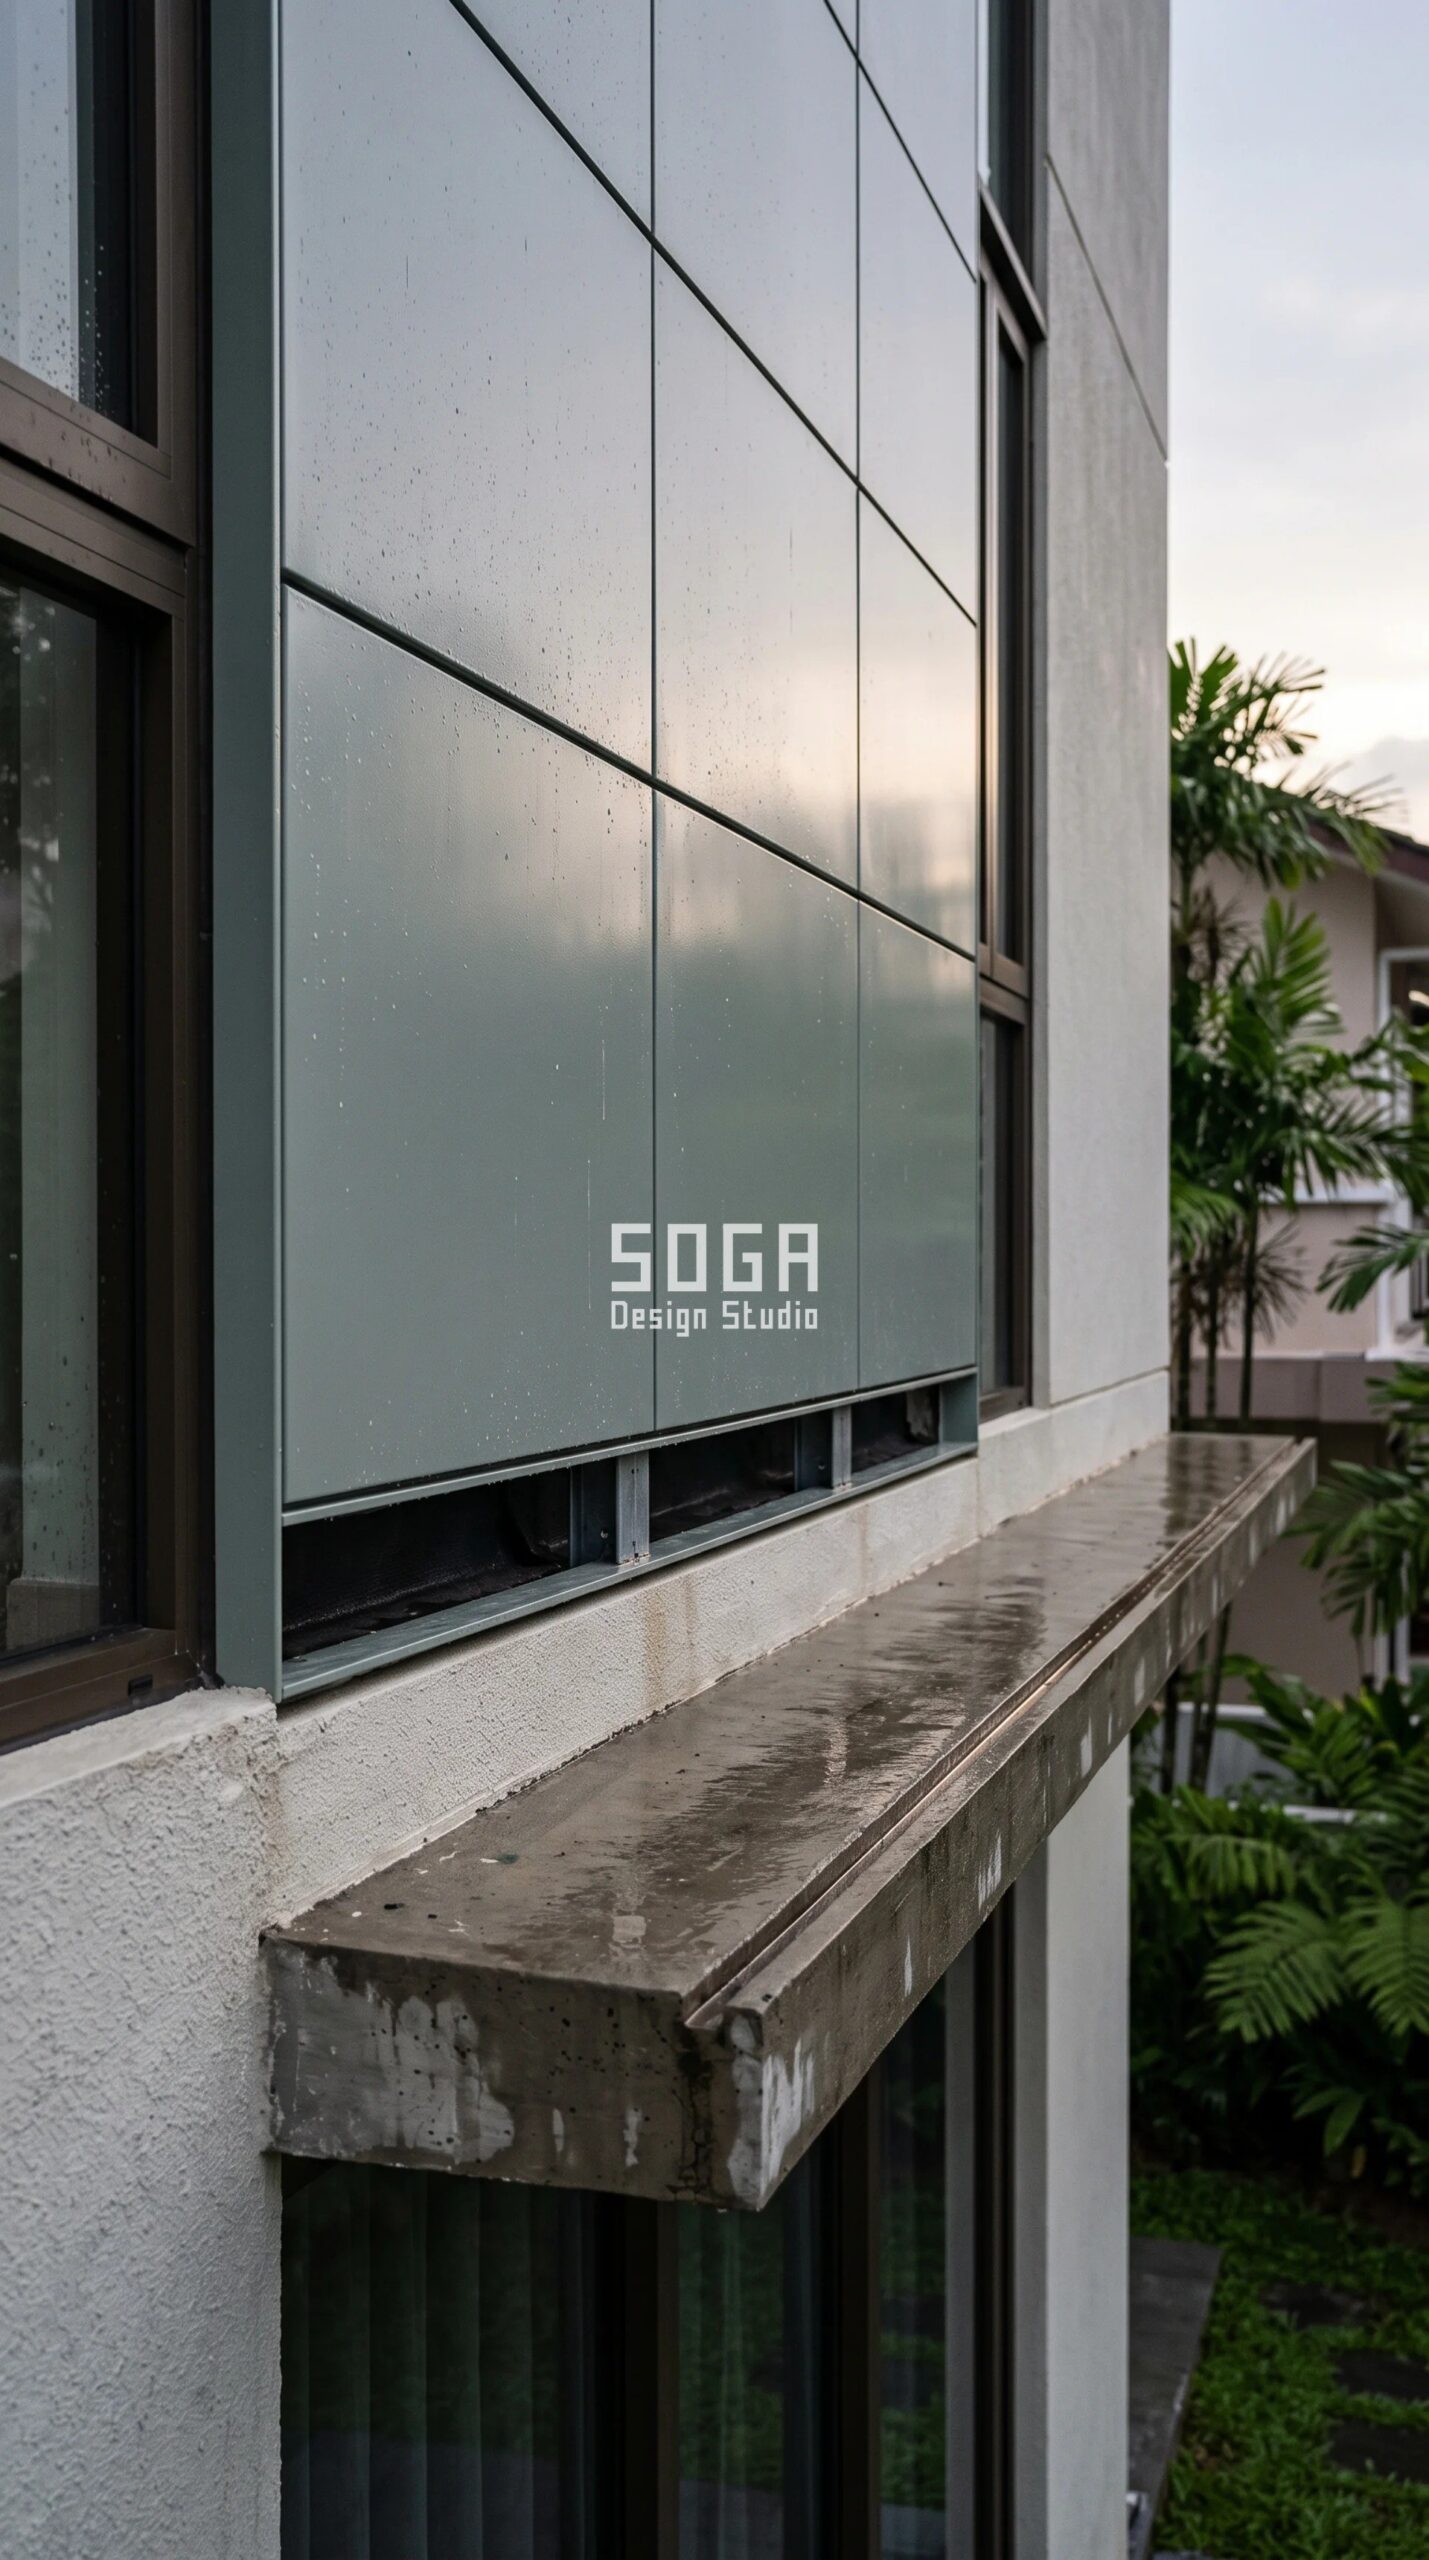
Design seed: Porous verandah-layered tropical massing x lightweight honeycomb panel skin x open-area gradation x powder-coated honeycomb-core metal panel x back-ventilated drying cavity x roof terrace above. This G+2 Detached bungalow in Bukit Timah, Singapore wears a Parametric Vent-Gap Panel Screen skin in 25 mm honeycomb-core metal panels in pale celadon-grey powder coat, on aluminium top-hat rails, off-white render body, dark bronze frames. This is leak path 3, the cavity that drains but never dries. Singapore’s problem is not that water gets in, it is that it never leaves. Humidity sits high enough that a cavity which only drains stays wet between downpours, and a wet cavity behind a metal skin is where mould and sub-frame corrosion begin. So the skin is detailed for drying: a 60 mm cavity, an open joint that widens where drying is slowest, ventilated compartment barriers, and a measurable free-area target at both ends of every compartment. The number that decides the facade is 1,000 sq mm of free ventilation area per linear metre at the top and at the bottom of each compartment. Vent only the base and the wall is drained, not back-ventilated – the air has nowhere to go, the stack effect never starts, and the cavity stays damp between showers for the life of the building. The parametric variation is written into the fabrication drawings, not sprayed on afterwards.
How the Parametric Vent-Gap Panel Screen is built
| Design parameter | Specification |
|---|---|
| Module | 900 x 1800 x 25 mm honeycomb-core metal panel in pale celadon-grey powder coat, 8 kg per sq m, 13 kg per panel – the lightest of the four skins, chosen so the sub-frame stays slim and the cavity stays clear |
| Gap driver | A drying-time map, not a sun map. Open joint width steps from 10 mm on the fast-drying west face to 22 mm on the shaded north and rear elevations, in 2 mm steps – 7 variants, all set by the rail |
| Ventilation target | Free ventilation area of at least 1000 sq mm per linear metre at BOTH the top and the bottom of every cavity compartment. This is the number that governs the whole facade in Singapore: with no top vent the cavity is merely drained, not back-ventilated, and it never dries |
| Cavity + compartments | 60 mm cavity – the deepest of the four, because airflow and not drainage is the constraint; compartment barriers at every floor use a ventilated open-state barrier, never a solid closer, so the vertical air path survives the fire detail |
| Drainage + drip | Continuous 15 mm slotted base track instead of point weeps; 30 mm drip nose with a 12 mm groove carried along every slab and balcony edge, so run-off leaves the building at the edge and never re-enters the cavity below |
| Sub-frame + fixings | 60 x 40 aluminium top-hat rails on A4-316 stainless brackets, about 340 panels, 7 gap variants, 0 unique panels |
Material & colour: hero skin in Pale celadon-grey powder coat / off-white render body / dark bronze frames, kept to a restrained palette so the geometry does the talking. Indicative facade cost: SGD 105 – SGD 155 per sq ft, fully designed and installed, with an itemised estimate produced per project.
4. Ras Al Khaimah Parametric Salt-Break Blade Course: A G+1 Waterfront Villa
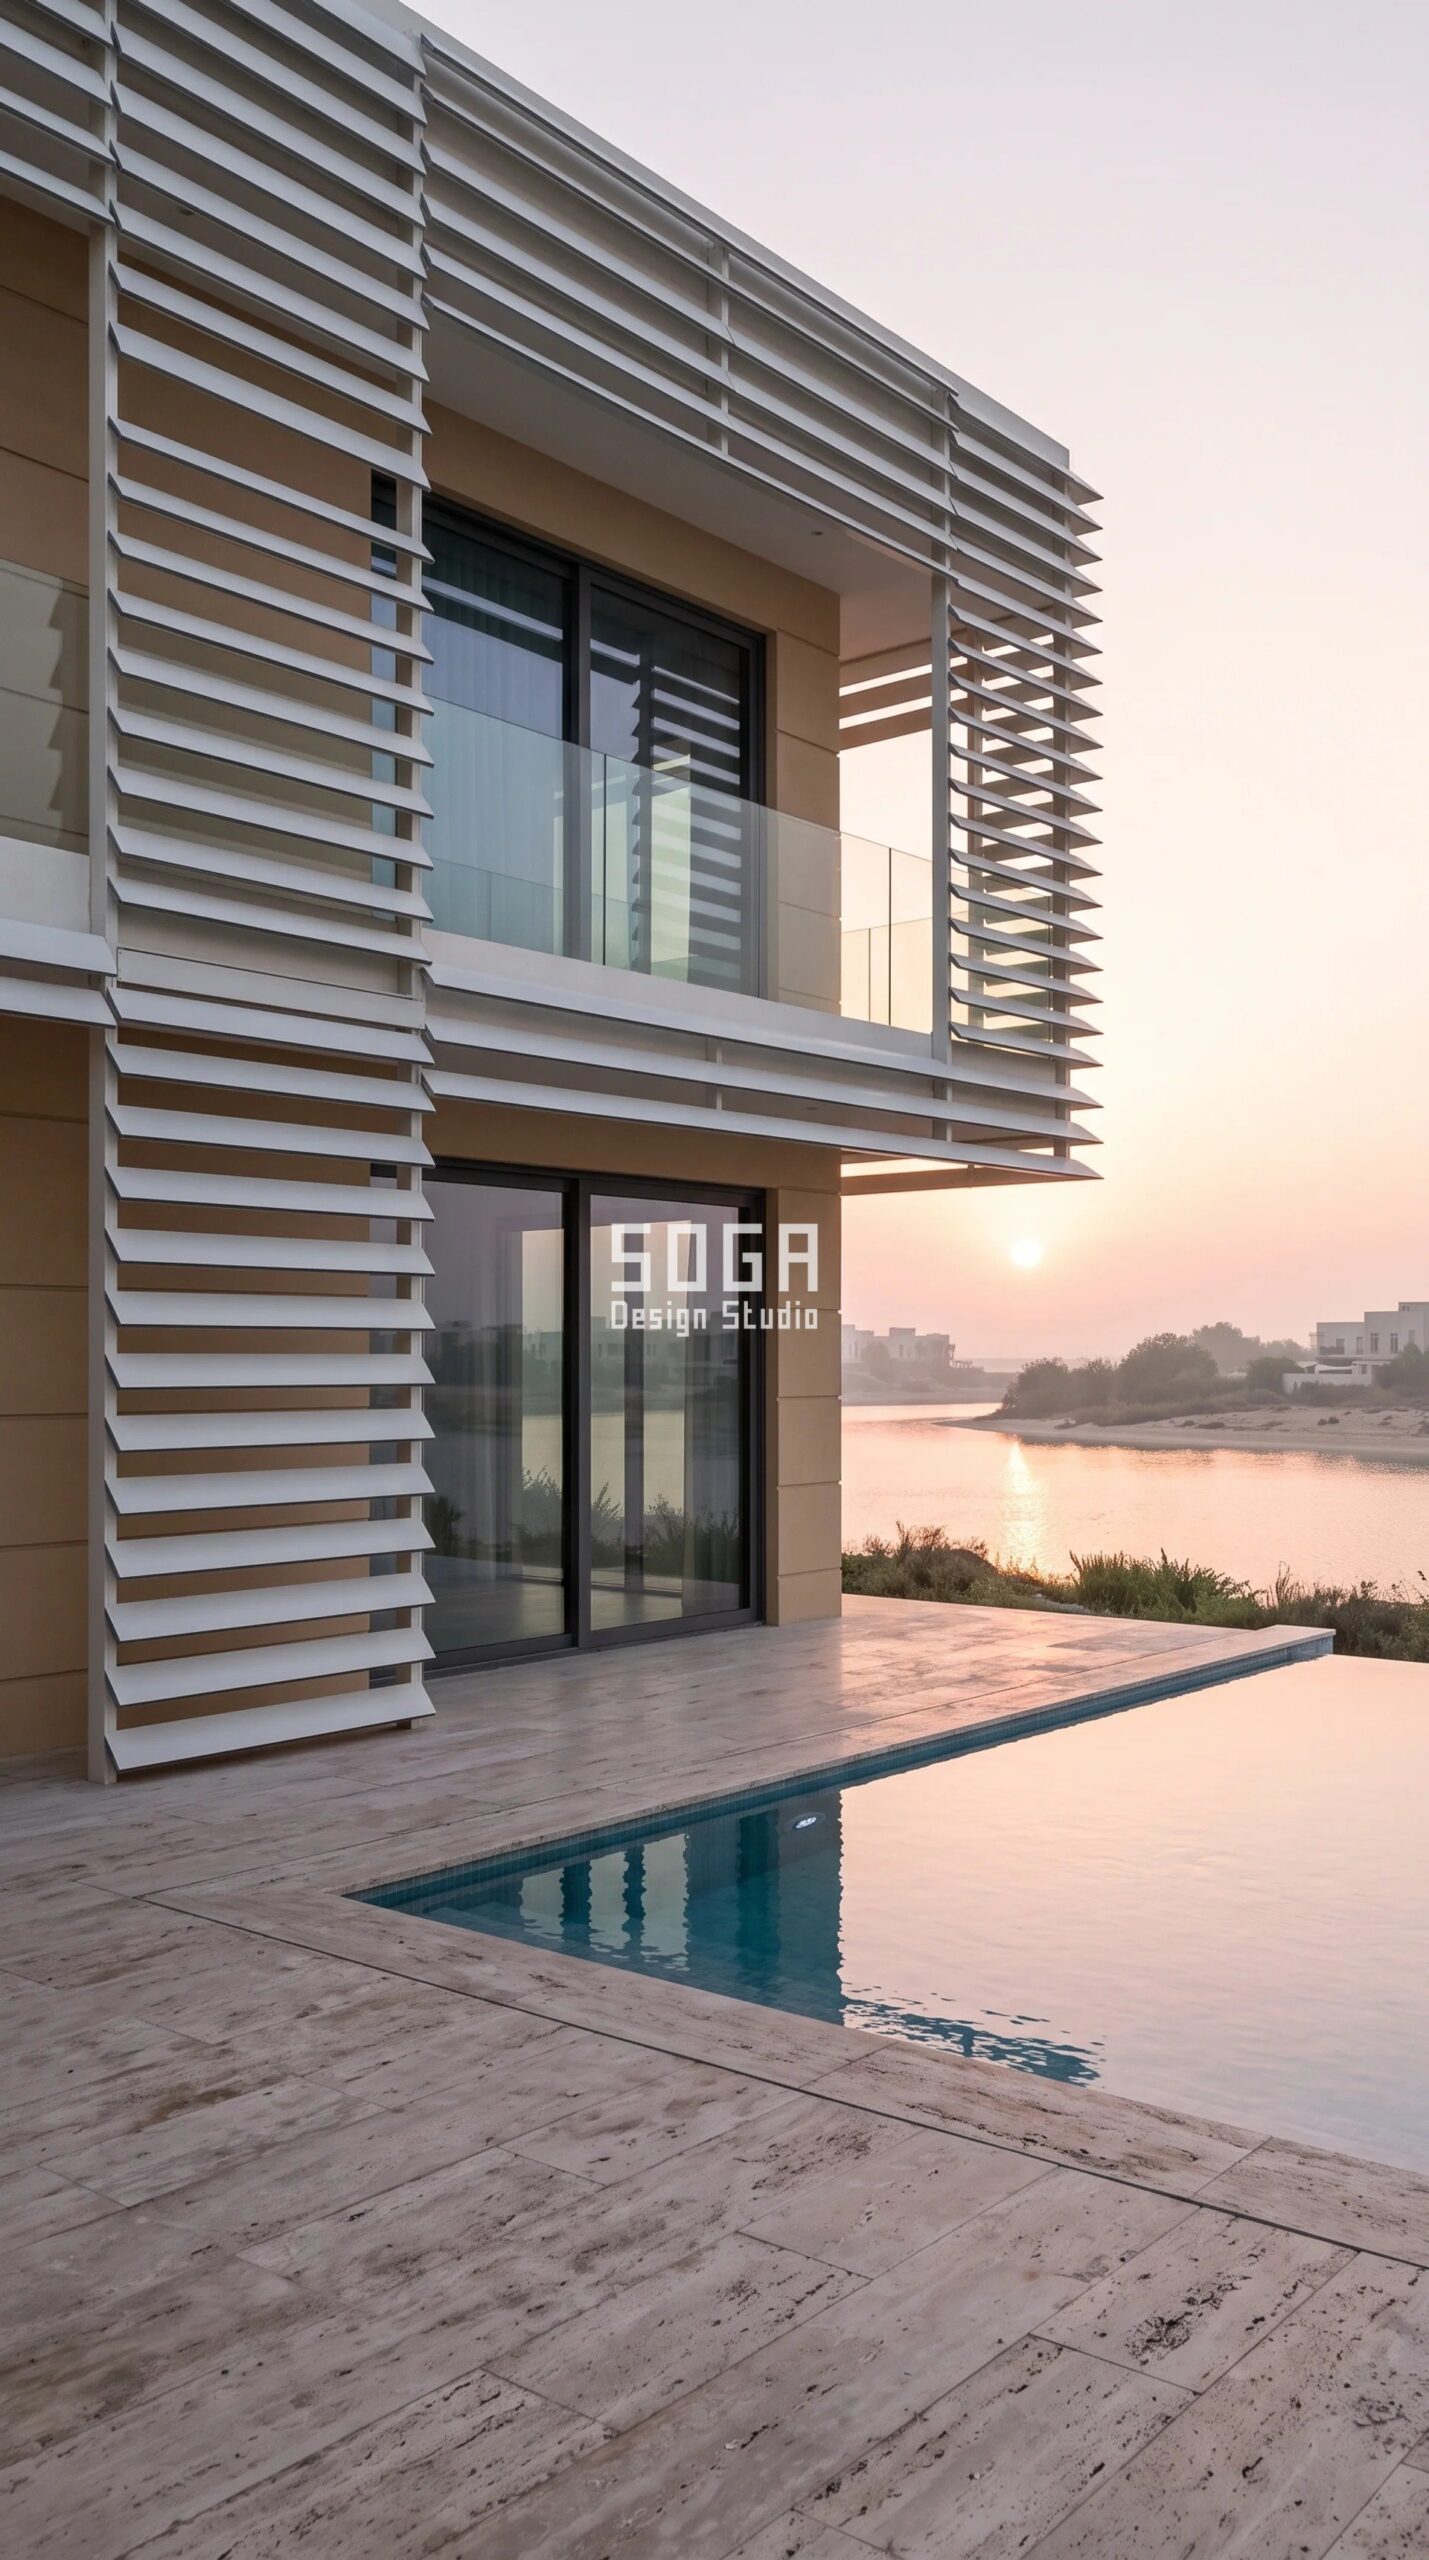
Design seed: Long horizon-banded waterfront massing x extruded blade shelter layer x blade pitch densification x marine-grade 5754 alloy blade in Seaside-class powder coat x salt-spray sheltering with a designed corrosion break x roof deck above. This G+1 Waterfront villa in Mina Al Arab, Ras Al Khaimah wears a Parametric Salt-Break Blade Course skin in 200 x 40 mm extruded marine-grade 5754 alloy blades in pearl-white Qualicoat Seaside-class powder coat, over a solid open-joint backing panel; warm sand render body. This is leak path 5, the sub-frame failing behind a panel that still looks new. Ras Al Khaimah’s waterfront plots share Dubai’s rainfall and none of its forgiveness. The failure here is almost never rain penetration through the joint – it is the sub-frame behind the joint, corroding quietly in warm salt-laden humidity that never drops below dew point at night. So the same drained cavity is specified, but everything metal inside it is upgraded a class, every dissimilar-metal contact is broken, and a freshwater rinse is designed into the building instead of being left to the owner to improvise. It is the reasoning behind our approach to coastal villa facade design across India, Dubai and Singapore: on a waterfront plot the specification argument is about fixings and isolation, not about the panel. The parametric variation is written into the fabrication drawings, not sprayed on afterwards.
How the Parametric Salt-Break Blade Course is built
| Design parameter | Specification |
|---|---|
| Module | 200 x 40 mm extruded marine-grade 5754 alloy blade in 3.5 m storey lengths, standing 120 mm proud of the backing panel as an outer shelter layer |
| Pitch driver | Salt-spray exposure mapped from the shoreline. Blade centres densify from 300 mm on the inland south-east face to 180 mm on the sea-facing north-west, in 20 mm steps, so the joints most exposed to spray sit behind the closest blade spacing |
| Joint + cavity | 12 mm open joints in the backing panel layer; 45 mm drained cavity behind it; cavity barriers at floor level and 750 mm corner closers; 10 x 30 mm slotted weeps at 500 mm centres |
| Corrosion break | The detail that actually decides this facade. A4-316 stainless fixings throughout, never A2-304. Duplex brackets: hot-dip galvanised at 85 microns plus a C5-M coating. An EPDM gasket and a nylon isolation washer at every single dissimilar-metal contact, because a bimetallic couple in salt-laden humidity destroys the fixing long before the panel fails |
| Coating class | Qualicoat Seaside-class superdurable polyester at 60 microns with chromate-free pre-treatment – a standard architectural powder coat is a five-year finish 400 m from open water |
| Washdown provision | A 20 mm freshwater line run at the roof parapet with a quick-connect at every elevation, so the skin is rinsed quarterly. Salt that is rinsed off is harmless; salt that accumulates inside a 45 mm cavity is not |
Material & colour: hero skin in Pearl-white marine powder coat blades with graphite blade edge / warm sand render body, kept to a restrained palette so the geometry does the talking. Indicative facade cost: AED 290 – AED 430 per sq ft, fully designed and installed, with an itemised estimate produced per project.
Leak Path 4: The Interfaces, and the Millimetres That Close Them
Leak paths 1, 2, 3 and 5 change with the climate. Leak path 4 does not. Water arriving at a window head in Bukit Timah behaves exactly as it does in Juhu: it runs down the face, reaches the underside of whatever projects, and then either drops clear or curls back along the soffit and re-enters the wall below. Surface tension decides which, and surface tension is beaten by one thing – a groove. A 10 to 12 mm drip groove cut into the underside of a 25 to 30 mm projection breaks the film and throws run-off about 20 mm clear of the face. Leave the groove off and the projection becomes an expensive gutter pointed at your own cavity. Most calls that begin with the words the cladding is leaking end here, at an interface, not at a panel – which is also why they are so often blamed on the wrong trade.
| Interface | The detail that closes it |
|---|---|
| Opening head (window and door) | 25 to 30 mm projecting drip flashing with a continuous 10 to 12 mm drip groove on the underside, throwing run-off about 20 mm clear of the face; end dams turned up 25 mm at both ends. |
| Opening jamb and sill | Cavity closer returned into the reveal, sill pitched 5 degrees outward with a stop end, and the membrane lapped over the sub-sill – never under it. |
| Floor slab edge and balcony edge | Horizontal cavity barrier at every slab, with the drip nose carried the full length so water leaves the building at the edge instead of re-entering the compartment below. |
| External corner | Vertical compartment closer within 600 to 900 mm of the corner, where wind suction peaks and drives cross-cavity flow behind the panels. |
| Parapet and coping | Coping falling inward, twin drip grooves, and the cavity vented and drained at the top – a sealed head is what traps everything the rest of the wall shed correctly. |
| Cavity base and inspection | Removable base flashing at about 3 m centres and a 10 x 30 mm slotted weep track, so the drainage line can be inspected and hose-flushed rather than assumed. |
Villa Rainscreen Facade Cost (2026)
Rates below are per square foot of finished facade area, 2026, supplied and installed. Two things about the shape of this table matter more than any single number. First, the water detail is priced on its own lines. The drained and back-ventilated sub-frame with its brackets and cavity barriers runs Rs 260 to Rs 480 per sq ft, and the drip flashings, slotted weep tracks and corner closers another Rs 90 to Rs 180 – together roughly 20 to 30 percent of the skin rate, and the first thing a value-engineering exercise deletes. Deleting it does not produce a cheaper rainscreen. It produces a face-sealed wall with a decorative panel in front of it. Second, that face-sealed option is priced last on purpose, because at Rs 550 to Rs 900 per sq ft it is genuinely cheaper and genuinely a different product: no cavity, no compartments, no second line of defence, and a resealing cycle beginning around year twelve. Read these lines against what a villa facade costs across these four markets as a whole and they are the part of the rate that is doing the waterproofing. Every band here is indicative; an itemised estimate is issued per project against the actual elevation area, exposure and access.
| System / material | Indicative rate (per sq ft) |
|---|---|
| Solid metal cassette rainscreen, 3 mm, PVDF matte | Rs 1,100 – Rs 1,900 per sq ft |
| Honeycomb-core metal rainscreen panel, 25 mm | Rs 1,400 – Rs 2,300 per sq ft |
| Extruded metal blade or fin shelter layer | Rs 900 – Rs 1,600 per sq ft |
| UHPC or GRC open-joint plank rainscreen | Rs 1,200 – Rs 2,100 per sq ft |
| Drained and back-ventilated sub-frame, brackets and cavity barriers | Rs 260 – Rs 480 per sq ft |
| Drip flashings, slotted weep tracks and corner closers | Rs 90 – Rs 180 per sq ft |
| Marine upgrade: A4-316 fixings, duplex brackets, Seaside-class coating | Add 8 – 14 percent to the skin rate |
| Face-sealed cladding on battens – what a leaking villa usually has | Rs 550 – Rs 900 per sq ft |
How SOGA Finds the Leak Before It Is Built
We run the access and exposure study before the pattern study. On a villa the first drawing is not an elevation, it is a driving-rain exposure map: plot orientation set against the prevailing storm direction, with each elevation graded from sheltered to fully exposed. Joint type, lap depth or blade pitch, and compartment spacing are all read off that map, which is why one quadrant of the Mumbai house is baffled and the rest of it stays open at 10 mm. Cavity depth is set next, from the governing constraint rather than from habit – drainage volume in Mumbai at 50 mm, a flushable path in Dubai at 40 mm, drying airflow in Singapore at 60 mm, 45 mm on a waterfront plot. Then compartments: a horizontal barrier at every floor slab, and a vertical closer within 600 to 900 mm of each external corner, where suction peaks and pulls air and water across the back of the panels.
Before fabrication we build a two-module mock-up with a real corner, a real window head and a real compartment base, and we wet it – spray rack on the face, a static pressure differential held across the joint, then the base flashing lifted to see what actually came out and how fast. On site there are two inspections we do not delegate. The first course, where the base flashing, the 10 x 30 mm slotted weep track and the cavity barrier are all still visible at once. And every slab level as the horizontal barrier goes in. Once the panels are hung, none of it can be checked again without taking them off.
This note covers the wall; the open balcony floor is a separate geometry problem, set out in balcony floor geometry and the wet band.
Related Reading
- Parametric facade design in India: systems, cost and what is buildable
- Coastal villa facade design: India, Dubai, Singapore and the UAE
- Mumbai coastal facade design: anti-corrosion and monsoon-proof cladding
- Villa facade design cost across India, Dubai, Singapore and the UAE
- Heat-resistant villa facade design for India, Dubai and the UAE
- How parametric metal facades are engineered and costed
- Villa Facade Design: India, Dubai & Singapore 2026 Guide
- District One & Dubai Hills Villa Facades 2026
Frequently Asked Questions
Does metal facade cladding leak in the monsoon?
A correctly built rainscreen does not leak, because it is not trying to be watertight at the panel face. Water is expected to pass the open joint; a 50 mm drained and back-ventilated cavity behind the panel catches it, and slotted weeps at 450 mm centres return it outside at every floor. What leaks is face-sealed cladding, where a bead of sealant is the only barrier – sealant has a 10 to 15 year service life and the house has a 60 year one.
Should villa facade joints be open or sealed?
It flips by climate and even by elevation. In Mumbai SOGA keeps joints open at 10 mm on the sheltered faces but converts them to a 40 mm labyrinth baffle on the south-west quadrant that takes the driving monsoon. In Dubai joints stay open but are narrowed to 8 to 12 mm so wind-driven sand does not fill the cavity. In Singapore joints are widened to as much as 22 mm because the cavity has to dry, not only drain.
How deep should a residential rainscreen cavity be?
SOGA sizes the cavity by what the climate asks of it: 40 mm in Dubai where the constraint is keeping a flushable drainage path clear, 45 mm on a Ras Al Khaimah waterfront plot, 50 mm in Mumbai for monsoon drainage volume, and 60 mm in Singapore because airflow for drying, not drainage, is the governing requirement there.
Why do weep holes block, and what should be used instead?
A 6 mm circular weep hole silts up within one season anywhere wind carries fine sand or dust, and a blocked weep turns a drained cavity into a tank. SOGA specifies 10 by 30 mm slotted weeps at 450 to 500 mm centres instead, with insect and sand screening at the cavity base only and never across the joint itself, plus removable base flashing so the cavity can be hose-flushed.
What stops water seeping in above windows and doors?
A projecting drip flashing with a continuous drip groove on its underside. SOGA runs a 25 to 30 mm projection with a 10 to 12 mm groove over every opening head and along slab and balcony edges, so water is thrown clear of the face instead of tracking back along the soffit and re-entering the cavity below. Without the groove, surface tension pulls the run-off straight back to the wall.
What actually fails on a coastal or waterfront villa facade?
Usually not the panel. It is the sub-frame: an aluminium bracket bolted to a steel angle with no isolation washer forms a bimetallic couple that corrodes fast in salt-laden humidity. On waterfront work SOGA specifies A4-316 stainless fixings rather than A2-304, duplex-coated brackets, an EPDM and nylon break at every dissimilar-metal contact, Qualicoat Seaside-class powder coating, and a freshwater washdown line at the parapet.
Get the Water Detail Right Before the Pattern
SOGA Design Studio designs and details villa facades for India, Dubai and the wider UAE, and Singapore. If a skin is already drawn, send the elevations and the plot orientation and we will mark the exposure map, the compartment lines and the interfaces that need a drip groove before anyone prices a panel. If nothing is drawn yet, better – cavity depth and joint type are far cheaper decisions at concept stage than at tender. Write to [email protected] with the location, the plot orientation and the floor count, and we will come back with the water detail first and the pattern second.