Brick texture facade ideas for India usually come down to one wish: a wall with depth and moving shadow that does not need a factory mould or a specialist crew. This post reads five SOGA Design Studio concepts through that wish. Three are clay walls (sawtooth tile fins, tipped tile flaps and pushed brick), one is a white ribbon-slab tower on a beach, and one is a grid of red and white cantilever boxes.
What the five share is a small repeating unit, one number that changes from place to place (a fold angle, a flap tilt, a slab-edge depth, a box projection, a brick offset) and shadow doing the visual work as the sun moves. What differs is where the relief is made: in the tile, in the volume, in the slab edge or in the brick course itself.
Read the lead image above first, then the four that follow in order. Each section says what is drawn, how it would be held to the frame, where it fails first and what to ask a fabricator or mason. A comparison table, a set of decision questions and a maintenance section close the post. All five images are studio visualisations, so every dimension is design intent for a concept, not a survey of a finished building.
These are concept designs by SOGA Design Studio, produced as design visualisations rather than photographs of completed buildings.
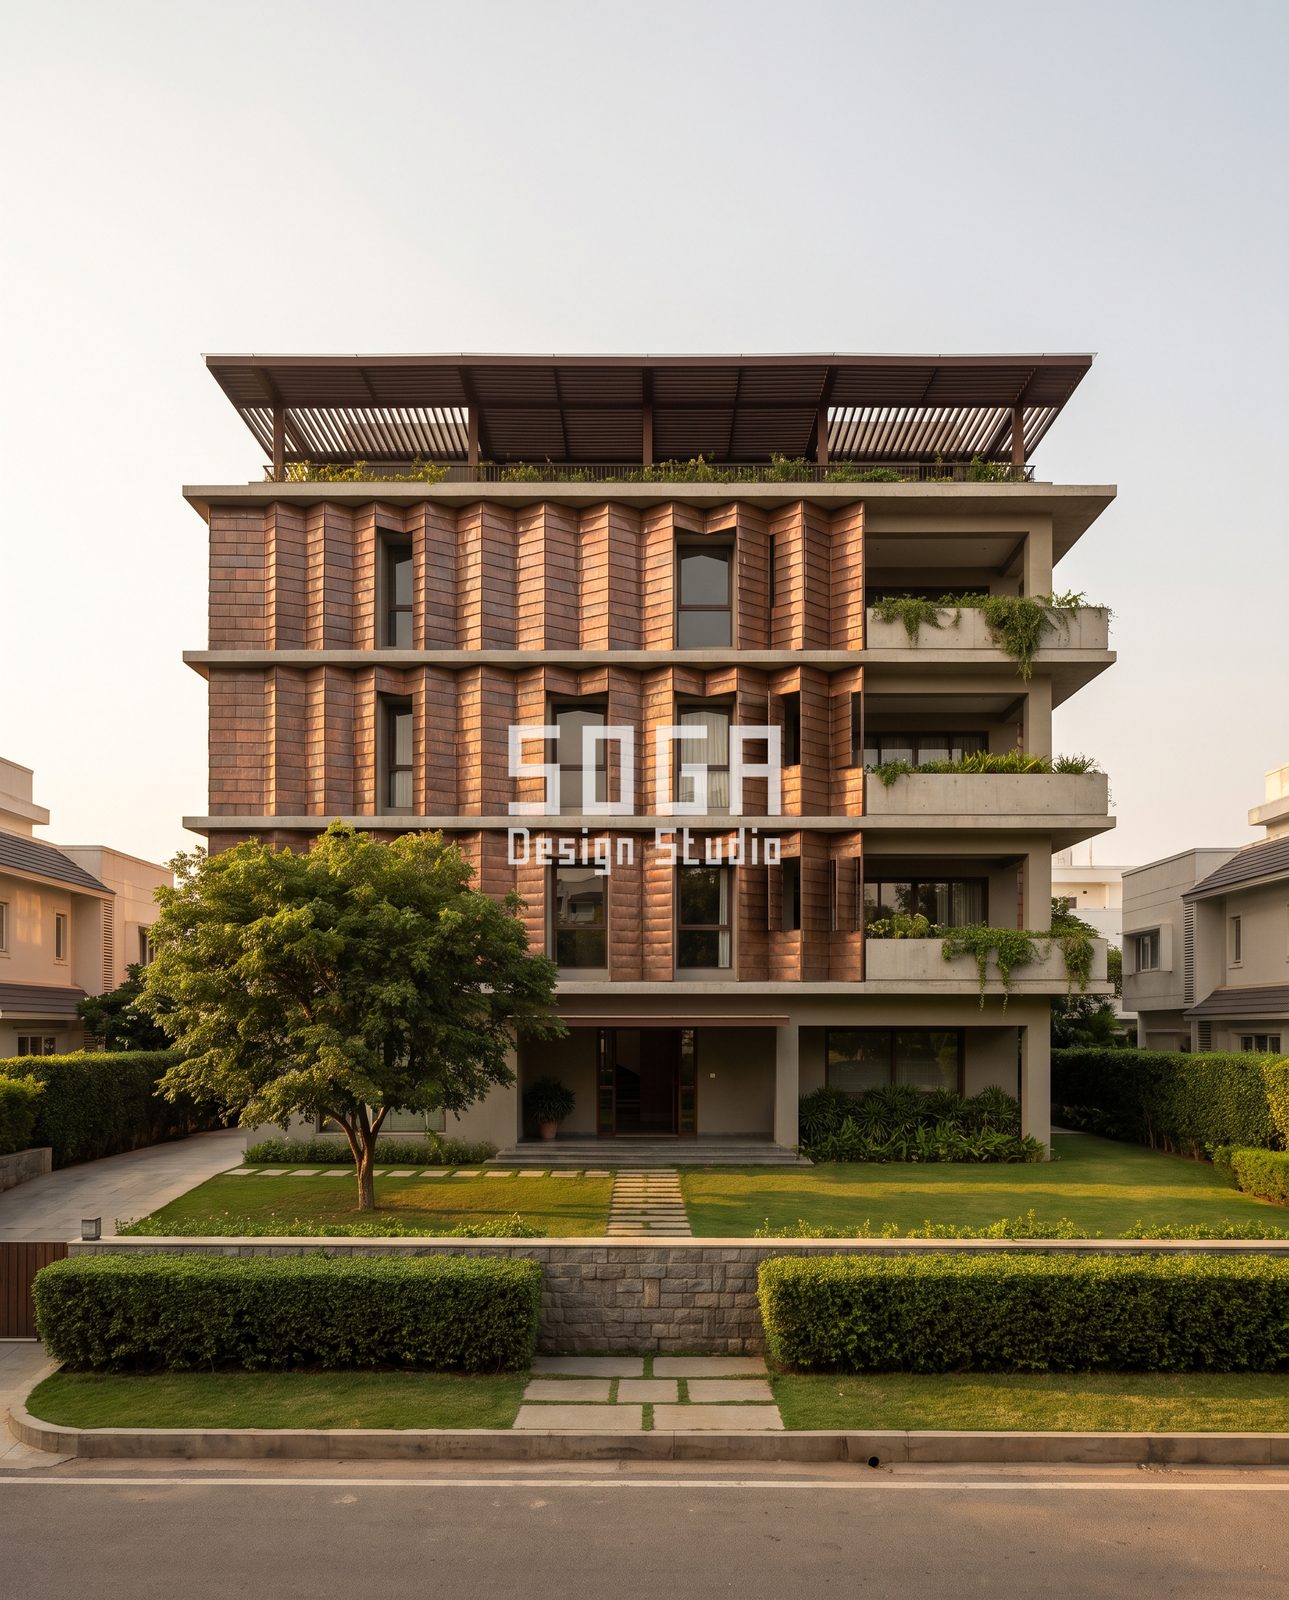
Sawtooth tile fins and a pergola roof: the veranda rebuilt in tile
The lead image above shows a four-level block on a suburban plot. The left 70 percent of each floor is a skin of copper-toned terracotta tile laid in horizontal courses but folded into vertical sawtooth fins, so each column steps in and out and catches light on alternate faces. The right 30 percent is recessed: deep balconies with concrete planter troughs and trailing creepers. A dark slatted pergola with a wide overhang caps a planted roof terrace.
The relief here is a fold, not an add-on. A fin about 300 mm deep behind a ventilated cavity of 50 to 70 mm on a concealed sub-frame lets rain run off the face and drain at the base, and the cavity keeps the wall behind cooler. Every tile is the same size; only the fold line repeats. That is why this idea suits a builder-floor budget better than it looks.
It fails first at the openings. Where a window cuts into a fin skin, the tile must be cut to a returned edge, and a poorly sealed reveal lets water in behind the cavity. The hinged shutter leaves drawn beside some windows only earn their place where the family will open them, since an unused shutter is dead weight on concealed hinges. Ask the fabricator for the reveal detail at one window before approving the pattern.
Planter troughs on the balcony side should drain through routed outlets into the stack, not over the slab face, or trailing creepers will stain the plain concrete edge within two monsoons.
Tipped tile flaps on a cantilevered cube: a raised-dot pattern in clay
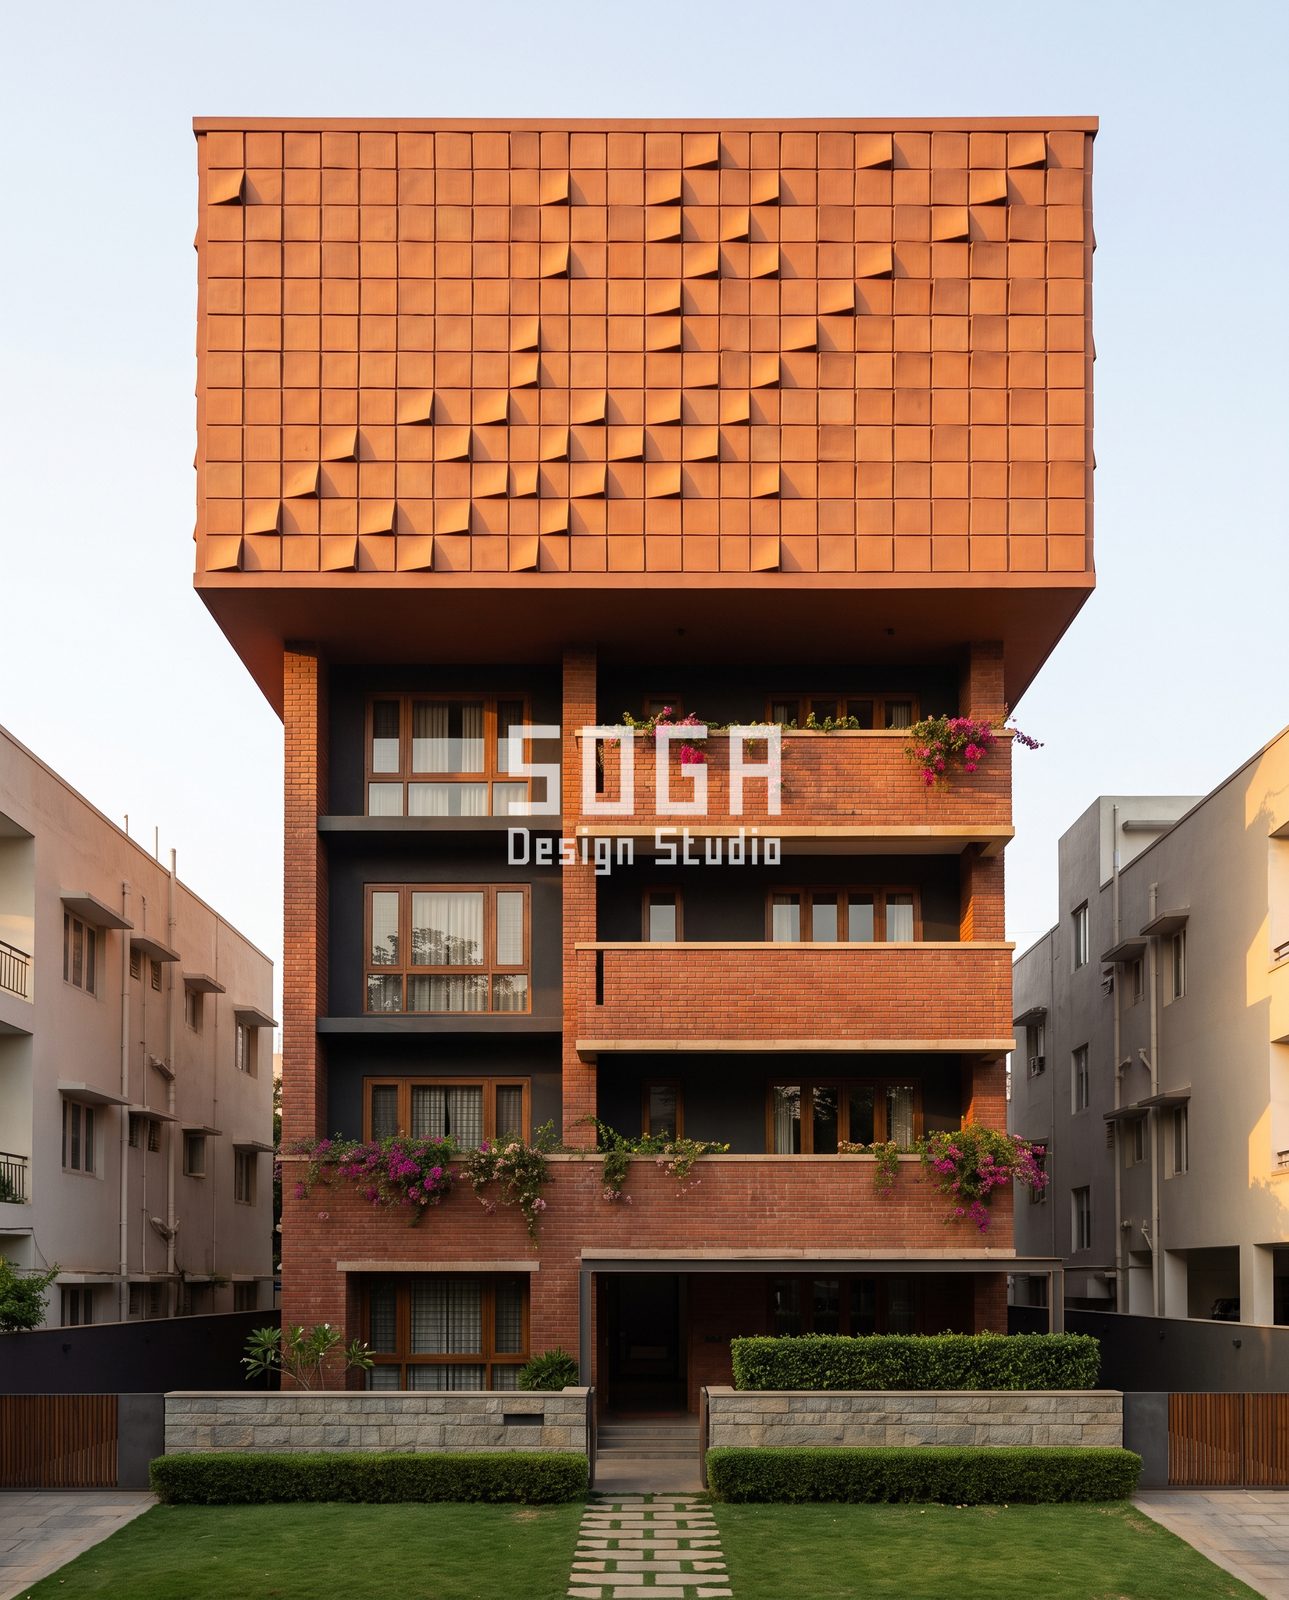
The second image is a windowless orange cube, about 45 percent of the visible height, cantilevered on all sides over a slimmer red brick base. The cube is a grid of square tiles, roughly 13 columns by 21 rows, and a scattering of tiles is tipped out like small flaps, denser toward the lower left. The eye reads it as a soft diagonal shadow, like a halftone dot photograph. The topic label calls this a brick dot pattern; what is actually drawn is tile flaps on a tile cube, with real brick only in the base.
A flap is a tile hung at its top edge and tilted out at the bottom by about 12 to 18 degrees. On a 450 mm tile that throws the lower edge forward by roughly 90 to 140 mm, enough for a real shadow at midday. All tiles hang on the same horizontal rail system whether flat or tipped; only a small clip differs. The rule that keeps it cheap is one yes-or-no choice per tile, flat or tipped, decided by a printed tile plan.
Density is the design control. Below about 10 percent the flaps look like damage, between 15 and 25 percent the gradient reads clearly, and above 35 percent the surface turns busy and collects dust. The cube also has no openings in this visualisation, so a real version needs a programme behind it (a stair, store or screened terrace), and the transfer structure under a cantilever of this size needs an engineer before the tile is drawn.
Coastal white ribbons: what a resort curve teaches a residential block
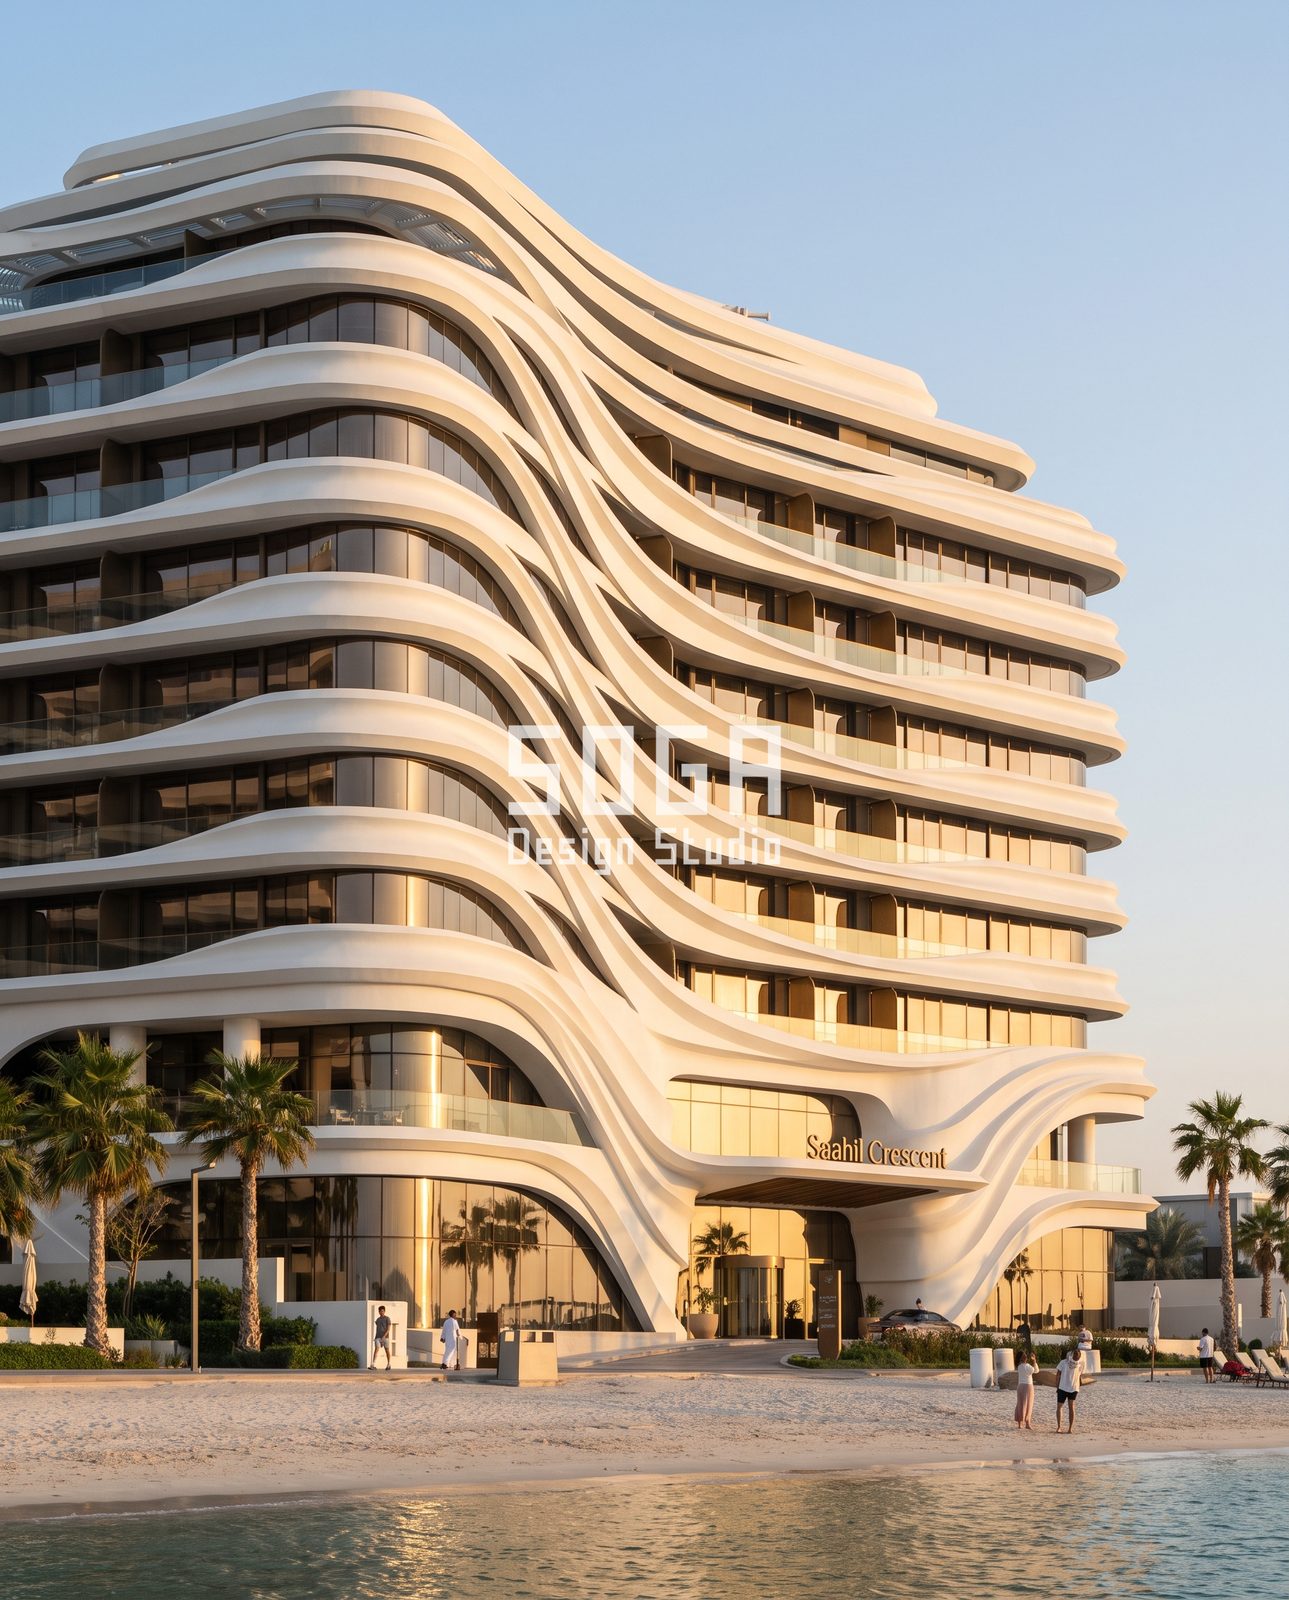
The third image is a different order of building: roughly nine storeys on a beach, every floor expressed as a thick white ribbon slab edge that undulates and converges into a swooping entrance canopy over a tall arched lobby. Behind the ribbons sit gold-tinted glass, glass-balustrade balconies and bronze-tone side fins, with a slatted pergola on the stepped-back top floors. The render carries an invented fascia name over the entrance; it is not a real business. The topic label says resort-style curved facade, which is right, though nothing here is a brick idea: the relief is made by slab-edge depth.
Borrow the ribbon as a shading device. A projecting slab edge of 900 to 1200 mm cuts high sun before it reaches the glass on a south or west face, and the curve makes a 300 mm edge read as a thin line from far away. Drop the bare balcony: hotel balconies stay empty, while home balconies collect a washing line, an air-conditioner unit and a bicycle within a year, so the residential version needs a screened utility corner and a condensate drain on every floor.
It fails first at the joints and the coating. Free-form ribbons are usually sculpted GRC shells over a concrete frame, each segment is unique and needs its own mould, and salt air attacks anything not marine grade. On a coastal Indian site such as Mumbai, Goa, Kochi or Chennai, ask for stainless fixings, drip grooves under every edge and a written coating specification with a recoat interval.
Staggered red and white boxes: depth from volume, not from surface
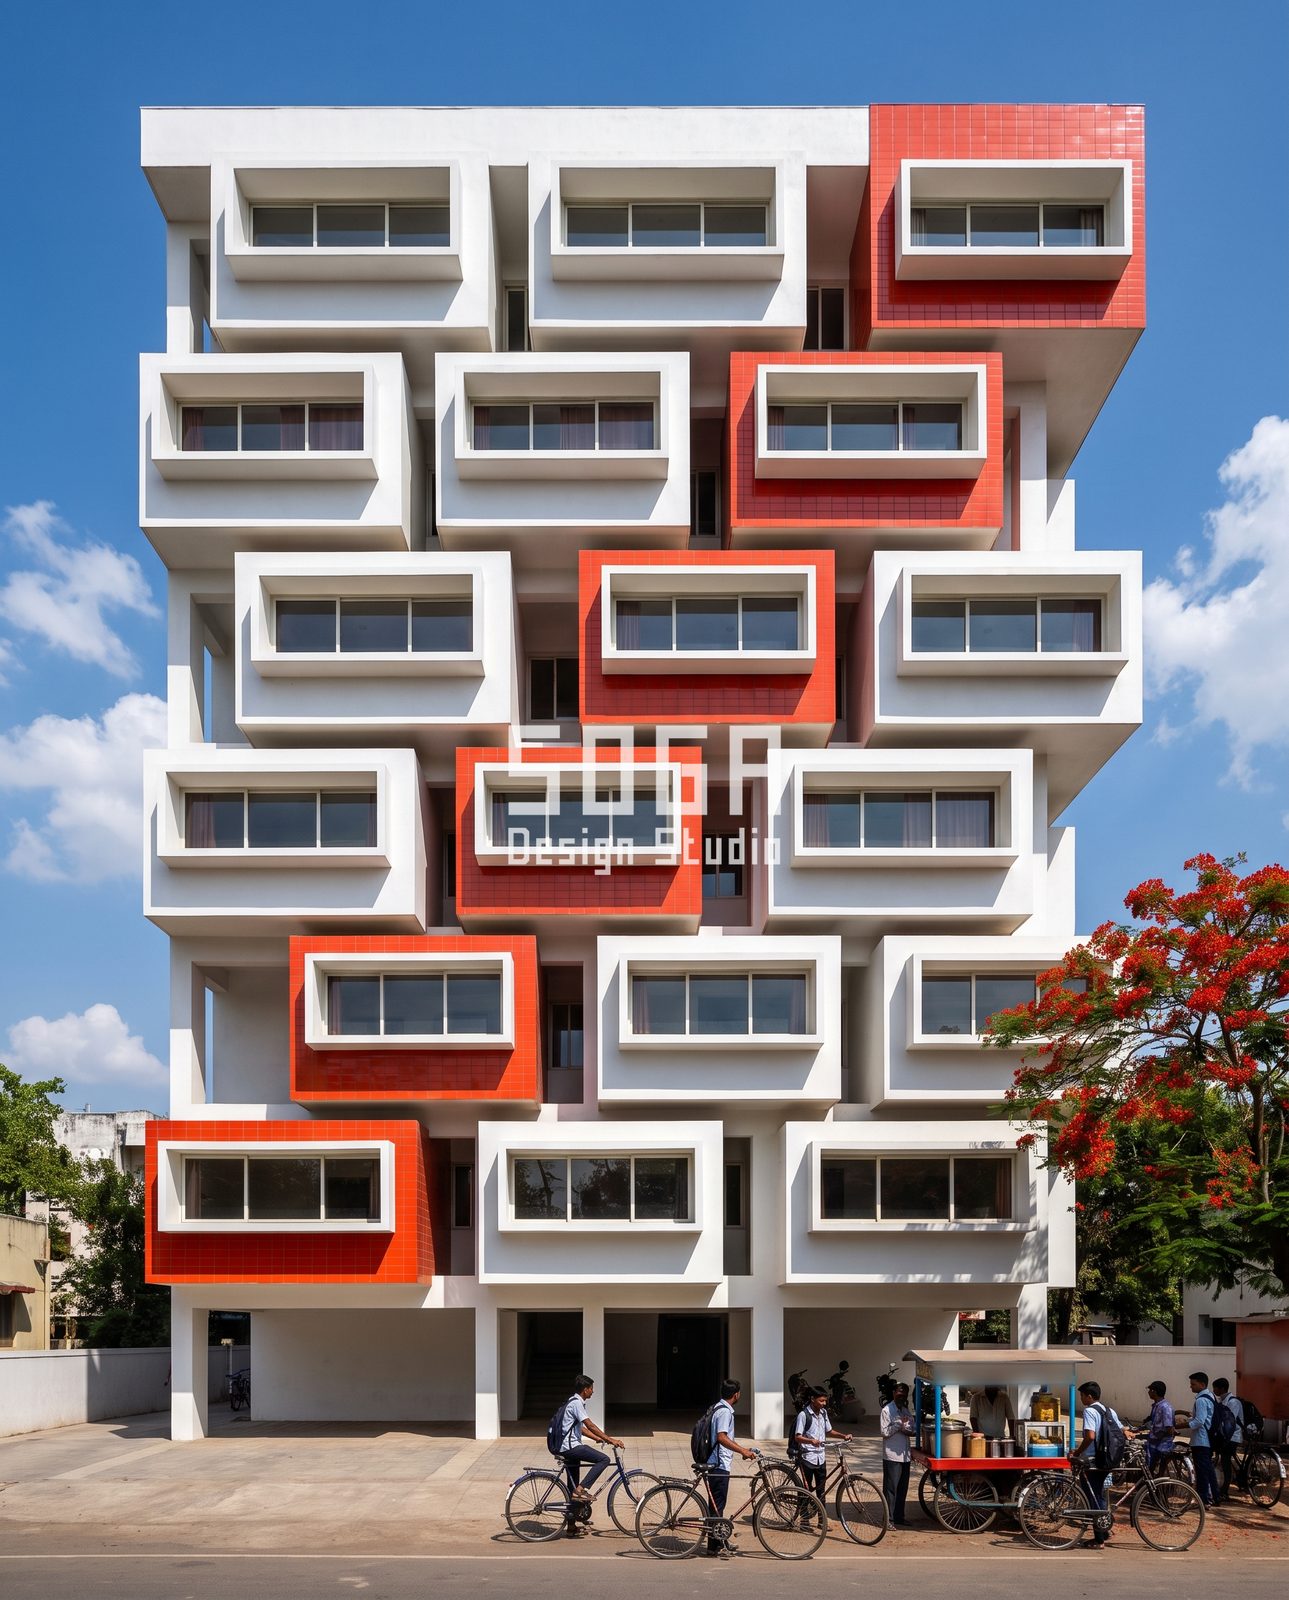
The fourth image is a dead-on elevation of six rows of projecting boxes over open pilotis, on a street with students on bicycles and a tea cart. Each box is a deep white frame around a three-panel ribbon window, and the rows are staggered so the arrangement reads as a checkerboard of cantilevers. Six boxes are clad in glossy red ceramic tile, running as a loose diagonal from top right to bottom left, with recessed dark slots and narrow windows between them.
For the concept, each box is about 3.6 m wide, 2.8 m high and projects 1.2 m from the column line. Build one unit that suits a bedroom or living room and the rest is arithmetic. Staggering each row by about half a box steps the load from column to column, breaks the shadow line and opens a slot where cross-ventilation can enter. A useful rule of thumb is that no box projects more than a third of its back span; a structural engineer sets the real limit.
Colour quota matters more than the colour. Roughly one box in three reads as a deliberate accent, one in two reads as a chequerboard and one in ten as a mistake. Glazed ceramic holds its colour in Indian sun better than paint, but tile boxes need movement joints about every 3 m, and red shows batch variation more than any other colour, so order the whole quota from one lot. Where this fails first is the underside of each box: without a drip edge, rainwater tracks back along the soffit and stains the white below.
A pushed-brick veil: a brick texture facade idea India masons can set out

The fifth image is the most literal brick texture idea in the set. An off-white concrete portal frame with a deep top-slab soffit holds a full-height brick veil on the left 60 percent, three storeys with no windows, where bricks are pushed out of the wall in a dithered diagonal swirl of protruding headers. The right 40 percent is open balconies with sliding glass doors, black railings and planted pots, and the ground level is a stilt carport. In the visualisation the shadow band sweeps from bottom left to upper right, away from the balconies.
There are no unique parts. Every unit is the same clay brick and the pattern is only the depth at which each is laid. A set-out sheet gives each brick a code: 0 for flush, 1 for 25 to 30 mm proud, 2 for 60 mm proud, printed from a density map in the computational model. Two aids keep it honest on site: a timber gauge block cut to each depth, and a one-metre mock-up panel approved before the wall starts. A correction on the mock-up costs a few bricks; the same correction on a nine-metre wall costs scaffold and days.
The veil is a skin one brick thick, not a load-bearing wall. It normally sits on a small ledge or angle at each slab, is tied back to the frame with stainless ties and is separated by movement joints at slab levels. It fails first in the monsoon: each pushed brick is a small ledge, so keep protrusion to about 60 mm, choose a dense, low-absorption brick and watch for white salt bloom and moss on the shaded face after the first rains.
Five ideas side by side: where each does its work and where it fails first
| Concept | What it does best | Where it fails first | What to check |
|---|---|---|---|
| Sawtooth tile fins (lead image) | Shade and texture from one repeated tile, cooler wall behind a cavity | Window reveals and planter stains | Reveal drawing, cavity drainage, trough outlets |
| Tipped tile flaps (image 2) | Halftone gradient from a single flat-or-tipped choice | Dust on flaps above 35 percent density, blank cube has no programme | Tile plan, clip detail, transfer structure |
| White ribbons (image 3) | Deep slab-edge shade and a strong entrance | Joints, salt, coating life, cluttered balconies | Coating specification, drip grooves, utility corners |
| Red and white boxes (image 4) | Cross-ventilation and a bold front from one repeated unit | Soffit staining, tile batch variation, cantilever limits | Box detail, movement joints, tile lot |
| Pushed-brick veil (image 5) | Lowest-risk relief, repairable by the trade that laid it | Efflorescence, moss, ledges holding dust | Mock-up panel, brick absorption, tie spacing |
None of the five needs a mould for every part except the ribbon tower. The tile and brick ideas rely on repetition and a plan sheet, and the box grid relies on one reusable formwork unit. Where a scheme mixes sizes or types, the saving from repetition disappears, which is also the honest reason two of the five cost less than they look. Cost drivers are the count of unique parts, cantilever weight, access and scaffold time, finish system and transport; an itemised estimate is produced per project.
How much relief each idea carries, in millimetres
Depth is the number that decides shadow, cleaning and cost, so it helps to compare it on one scale for the concepts above.
- Pushed brick: 25 to 60 mm proud of the wall plane, the shallowest and easiest to clean.
- Tipped tile flaps: about 90 to 140 mm at the lower edge of a 450 mm tile, tilted 12 to 18 degrees.
- Sawtooth tile fins: about 300 mm deep folds over a 50 to 70 mm ventilated cavity.
- Projecting boxes: about 1.2 m from the column line, a volume rather than a surface.
- Ribbon slab edges: 900 to 1200 mm projection with a slab edge that can be 300 mm thick.
Below about 30 mm relief the pattern only reads at low sun angles; above about 300 mm it starts to behave as shading and as a room, with structure and waterproofing to match. Pick the depth for the job you want it to do.
Four questions that decide which idea suits your plot
- Is the wall solid or does it need openings? Pushed brick and the tile cube suit blank walls; fins and boxes carry windows.
- Which way does the wall face? A west face rewards deep relief and shade; a north face can carry fine texture that only reads at low sun.
- Who will maintain it? A society with a cleaning contract can carry ribbons and flaps; a single family is safer with brick or fins that a local trade can repair.
- How much of the cost can you put into unique parts? If the answer is none, choose brick, tile fins or boxes and leave the ribbon as a reference for the entrance only.
A hybrid often works: a ribbon canopy or one pushed-brick feature wall at the entrance, with a calm repeated skin above. Choose one idea to lead and let the others stay quiet.
Sun, monsoon and dust: keeping textured surfaces clean
Every relief surface is a ledge for water and dust, so the maintenance plan is part of the design. Wash-down access at each floor, drip edges under every projection and a breathable water repellent on clay finishes do more than any coating claim. Brick and terracotta age differently: brick darkens slightly with monsoon damp, and under-fired tile can bloom with salts, so ask for a sample panel exposed on site through one season before the full order.
Keep clay tones from one family when you combine them, as the tile cube and brick base do in image 2, and keep glazed colour to a fixed quota, as in image 4. Ask for concealed fixings on every panel, so nothing metallic shows on the face and nothing is left to rust at the joints. Finally, view the pattern at three times of day on the real plot orientation; the visualisations here show a single moment of light.
Related Reading
- terracotta facade design in India
- parametric facade design for Indian buildings
- how usable a curved balcony really is
- stacked volume facades and cantilevers
- facade material pros and cons
Frequently Asked Questions
What are the best brick texture facade ideas for an Indian home?
The lowest-risk idea is a pushed-brick veil, where standard clay bricks are laid at varied depths of 25 to 60 mm from a printed set-out sheet. Tile fins and tipped tile flaps give a similar effect with a hung tile skin. Choose by wall orientation, maintenance capacity and whether the wall needs windows.
Is a brick relief wall load bearing?
In these concepts it is not. The veil is one brick thick, carried on a small ledge at each slab, tied back to the concrete frame with stainless ties and separated by movement joints. A structural engineer should confirm the ledge, tie spacing and movement joint positions for the real height and wind zone.
Do textured brick facades survive the monsoon?
They can, if the brick is dense and low-absorption, protrusions stay under about 60 mm and every projecting ledge sheds water. Expect efflorescence after the first monsoon and moss on shaded faces. A breathable water repellent on the finished veil helps, but it does not replace a well-fired brick and well-filled joints.
Can I use tile flaps or brick relief on a small plot?
Yes, because the design lives on the wall plane and needs no setback. Tile fins add about 300 mm of depth and a cavity, so check the bye-law projection limits on your boundary. A large cantilever, like the cube above, needs a structural engineer and is rarely practical on a narrow plot.
How do these facades compare on cost?
Cost follows the count of unique parts, not the look. Pushed brick and repeated tile fins use one unit everywhere, boxes reuse one formwork, and sculpted ribbons need a mould per segment. Access, scaffold time, finish system and transport matter too. SOGA Design Studio prepares an itemised estimate for each project instead of a rate card.
What should I ask a fabricator before approving a textured facade?
Ask for a one-metre mock-up, the fixing and drainage detail at one window, the tile or brick absorption figure, the movement joint spacing and the recoat or cleaning schedule. For sculpted concrete or GRC edges also ask for joint locations, drip grooves and a written coating specification.
Want a textured facade drawn for your plot?
Send us your plot size, orientation and city and we will suggest which of these depth ideas suits it. The buildings shown here are concept visualisations. Contact SOGA Design Studio for an itemised estimate.