Type “house elevation design” into Google and you get several thousand pictures and almost no reasoning. Every result is a gallery. None of them tell you what any of it costs, which of these skins survives a Delhi summer or a Mumbai monsoon, or why a design that looks effortless on a 60 ft plot falls apart on a 30 ft one. That last point matters more than any style choice, because most Indian city houses are not built on 60 ft plots. They are G+3 and G+4 on a frontage between 25 and 40 feet, hemmed in on both sides, with a single face doing all of the architectural work. Every elevation below was designed for exactly that constraint. For each one: what it is, how it is actually built, roughly what it costs, and what it costs you.
The elevations shown here are design work by SOGA Design Studio. Rates quoted are indicative 2026 ranges for budgeting, not quotations – every project is estimated on its own drawings.
Why a G+3 or G+4 Front Elevation Is the Hardest One to Get Right
On a narrow urban plot almost every constraint works against you at once. Only the front face is ever seen, because the neighbours sit within a few feet on both sides and those walls stay blank. The setback leaves you very little depth to project into, so the entire design has to happen in a shallow zone on one plane. Height is frequently capped by the width of the road you face rather than by what you want to build. The ground floor is usually surrendered to stilt parking, which removes the storey at eye level – the one a visitor actually stands next to. And because the street is narrow, nobody ever views the building from far enough back to take it in whole; they see it from about twenty feet away, at a steep angle, in pieces. A design that photographs well in elevation can fail completely under those conditions. The eight below are organised by the problem each one solves, because on a plot this tight the problem should pick the style, not the other way round.
On a G+3 or G+4 plot that depth is finite: the projection budget a front setback leaves you is one number, spent once, by whichever element reaches furthest.
1. The Fluted Fan Column: Sculpture That Doubles as a Balcony Edge
The columns do not stop at the slab. They splay open at every floor like a palm opening, and the flare becomes the balcony edge, so what would normally be two elements – a column and a railing – reads as one continuous piece of joinery running up the building. See also: keeping pigeons off a balcony railing without a net.
The move looks expensive to fabricate and is not. Every fin in that flare is a straight section; the fan comes from the angle each fin is fixed at, not from bending anything. Straight members on a curved carrier rail is the single most useful trick in this whole article, because bent metal is where facade budgets die. The wood-shade finish is on metal rather than real timber, which is what lets it sit in full Indian sun without an annual oiling cycle.
| At a glance | What it means on site |
|---|---|
| What it is | Vertical fin screen that flares open at each slab edge |
| How it is built | Straight fin sections fixed at varying angles to a curved carrier rail |
| Best suited to | A 30-40 ft frontage where the owner wants one strong signature move |
| Finish | Wood-shade coating on metal – the warmth of timber without the maintenance |
The trade-off: The flare is a dust trap, and on a main road it will need washing two or three times a year to keep the wood-shade tone reading warm rather than grey. It also claims roughly half a metre of balcony depth, so on a shallow balcony you are trading usable floor for the elevation.
2. Faceted Folded Panels: Depth Without Projection
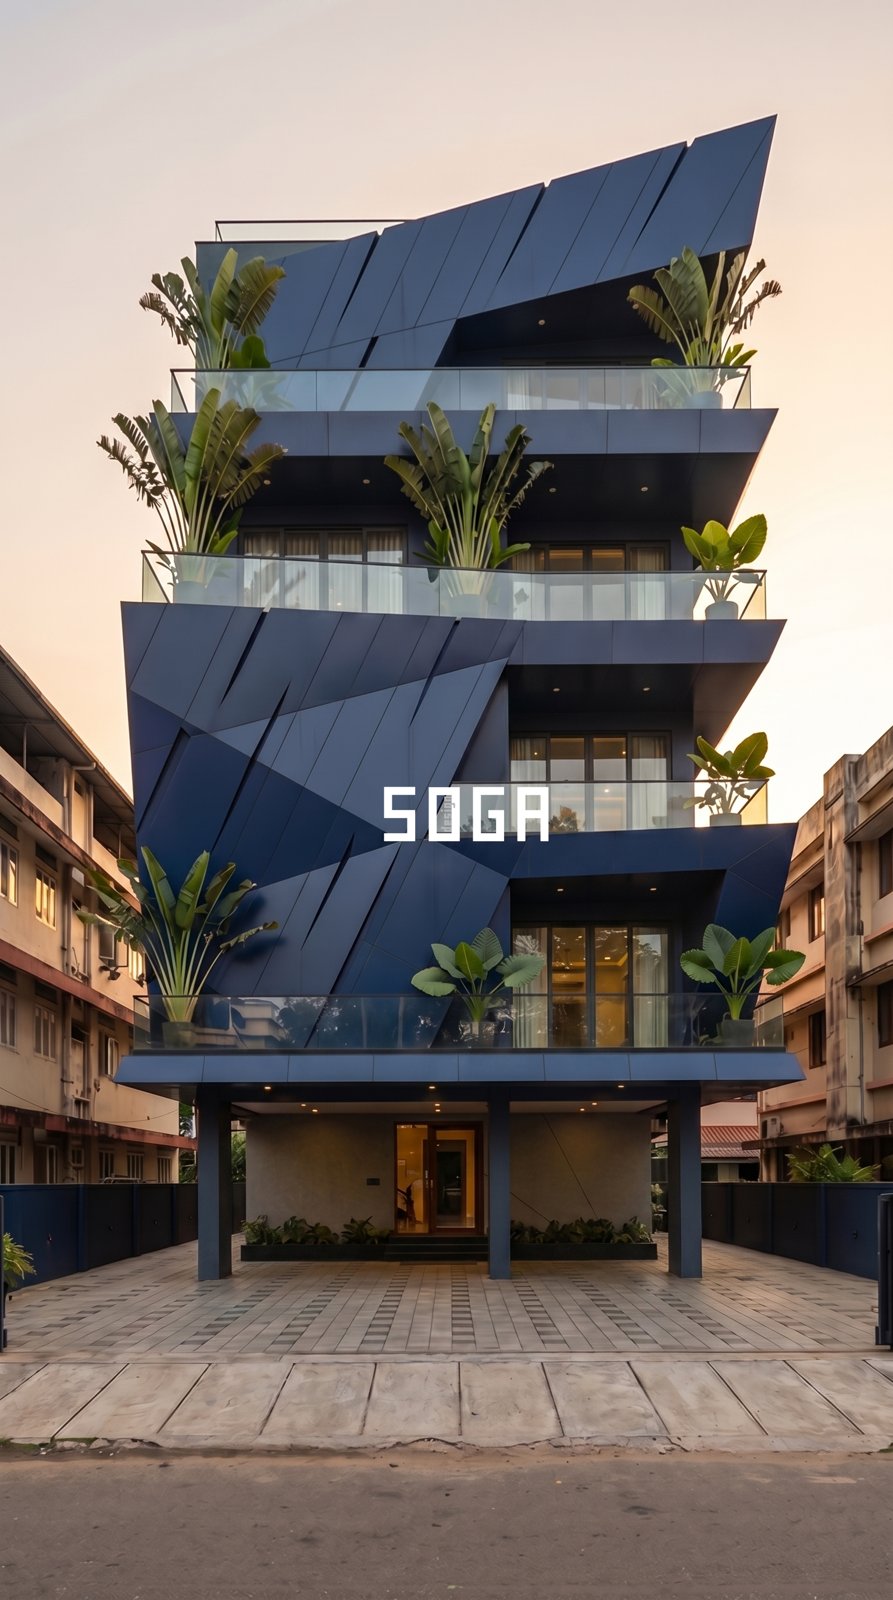
This one is doing its work with shadow rather than material. The planes fold in and out across the face, and at midday the elevation is almost graphic – hard triangles of light and dark that change completely by four in the afternoon.
Structurally it is the least demanding facade in this list. Flat sheet is press-braked into facets and cassette-fixed back to the frame, and the whole system projects only 100-200 mm, which means it fits inside a tight setback where a deeper screen would cross the boundary line. If your plot has no room to project, this is usually the answer.
| At a glance | What it means on site |
|---|---|
| What it is | Press-braked flat panels folded into angular facets |
| How it is built | Cassette panels on a clip system, typically 100-200 mm total depth |
| Best suited to | Tight setbacks, and north or east faces where you want drama without heat gain |
| Finish | Deep matte tones – the darker the colour, the harder the shadow reads |
The trade-off: Dark colours on a west face run hot and show every water streak and dust line. If this elevation faces the afternoon sun, either move to a mid-tone or accept that you are buying a drip detail at every horizontal fold and a wash cycle to match.
3. Planter Pods: Greenery That Is Actually Designed In, Not Added On
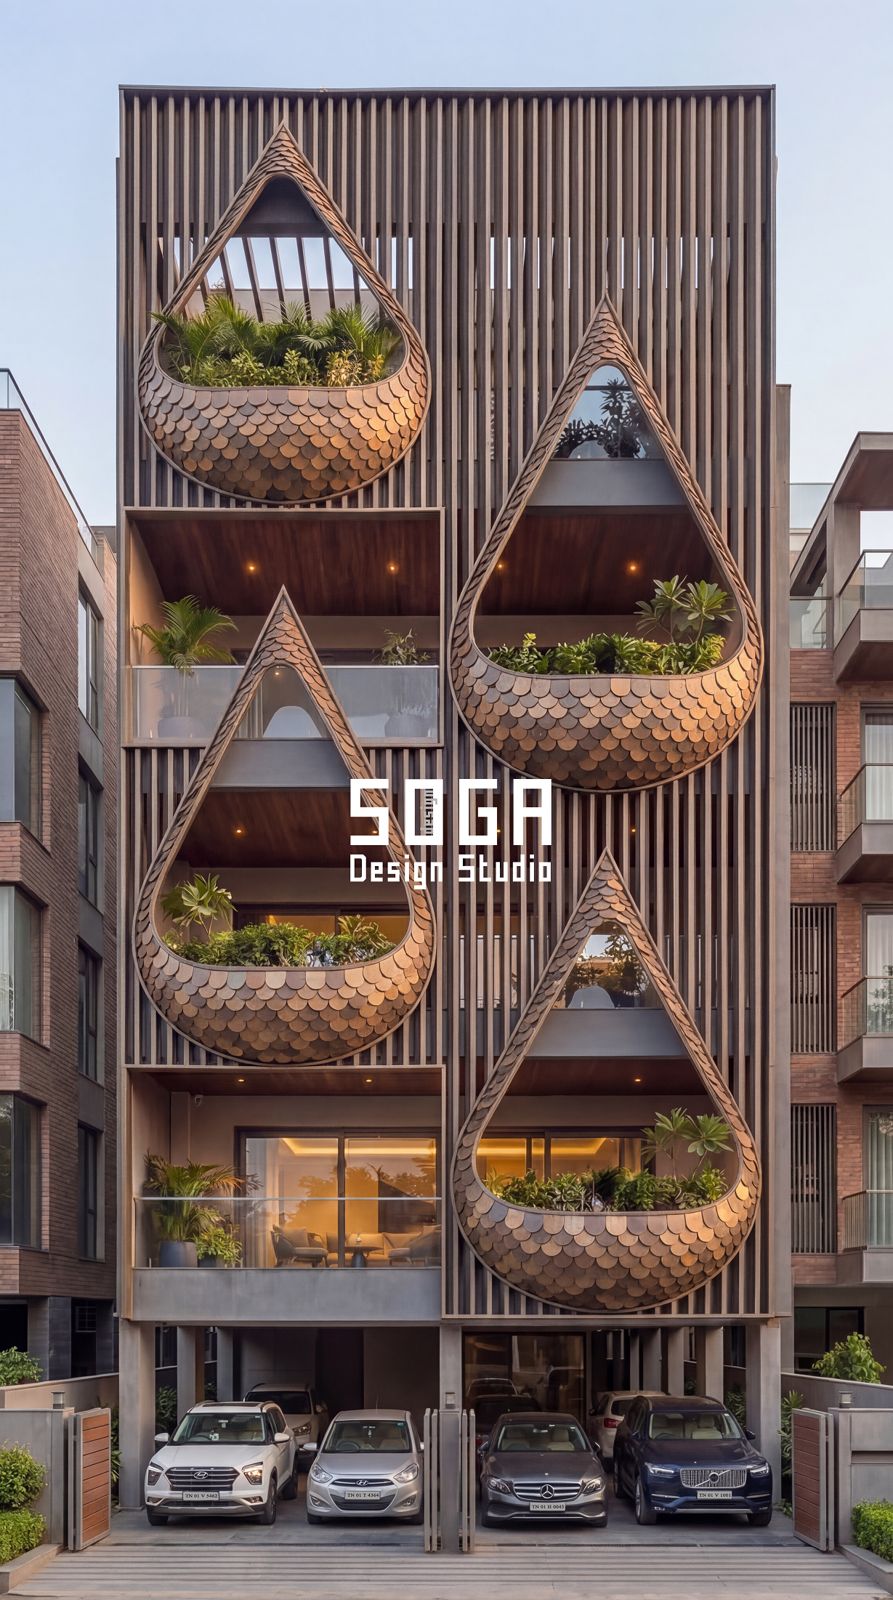
Most ‘green facades’ in Indian residential work are pots someone put on a balcony. These are different: teardrop-shaped pods clad in overlapping scales, built into the elevation as structure, each one deep enough to hold a real root ball rather than a token planter.
Detail that pod as a wet structural box, not a shape: a 600 x 450 mm continuous planter adds about 5.9 kN per running metre of slab edge once the soil is saturated, which is why house elevation design with plants lives or dies on soil depth, a root barrier and a second outlet.
The pod is a steel bowl with a waterproof liner and a drainage outlet, hung off the frame, with the scale cladding as a separate skin over it. The fin screen behind does the privacy work so the planting can be generous without exposing the rooms. Done this way the greenery is a permanent part of the elevation instead of something that disappears the first summer nobody waters it.
| At a glance | What it means on site |
|---|---|
| What it is | Structural planter pods integrated into a vertical fin screen |
| How it is built | Steel bowl, waterproof liner, piped drainage, scale-clad outer skin |
| Best suited to | Owners who genuinely want planting, on any frontage from 25 ft up |
| Finish | Metal scales over the pod; fin screen in a contrasting tone behind |
The trade-off: This is a garden on your front elevation, and it has to be treated like one. It needs a watering line, someone to maintain it, and the drainage must be piped away properly – unpiped pod drainage will stain the facade below within one monsoon, and that stain is very hard to remove.
4. Terracotta Baguettes: The Climate Answer That Also Buys Privacy
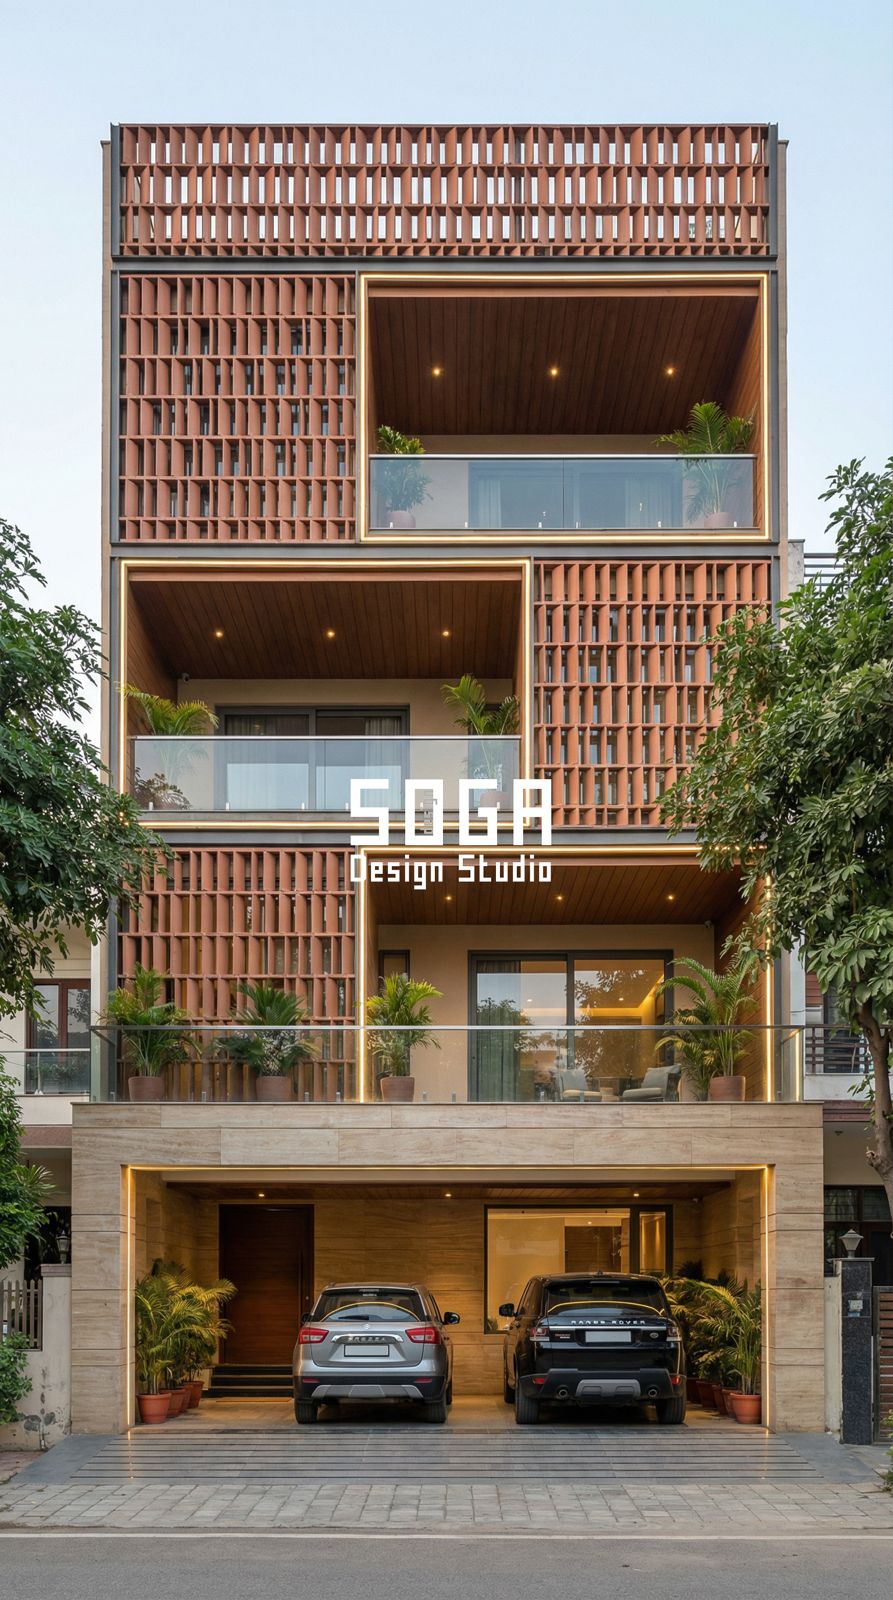
Vertical clay rods, spaced so you can see out but not in, with the spacing tightening exactly where the low sun lands and where the neighbour’s window looks across. It is the oldest idea in Indian architecture rebuilt with an extruded product and a clip rail.
The reason to specify fired clay over a coated metal here is simple and worth knowing: the colour is the material. It is fired through the body, so it does not fade to a repainting cycle the way an external coating does, and there is a ventilated cavity behind the screen that keeps monsoon water off the structural wall.
| At a glance | What it means on site |
|---|---|
| What it is | Extruded fired-clay rods hung as an open screen |
| How it is built | Clay baguettes clipped to vertical rails, ventilated and drained cavity behind |
| Best suited to | West and south-west faces, and any elevation overlooked from close by |
| Finish | Unglazed fired clay – colour runs through the body, so it does not fade |
The trade-off: An open screen is also an open dust path, and the cavity behind it needs a cleaning route designed in from the start. Fired clay is also brittle: a stray cricket ball will crack a rod, so specify removable clips rather than adhesive, or a five-minute repair becomes a scaffold job.
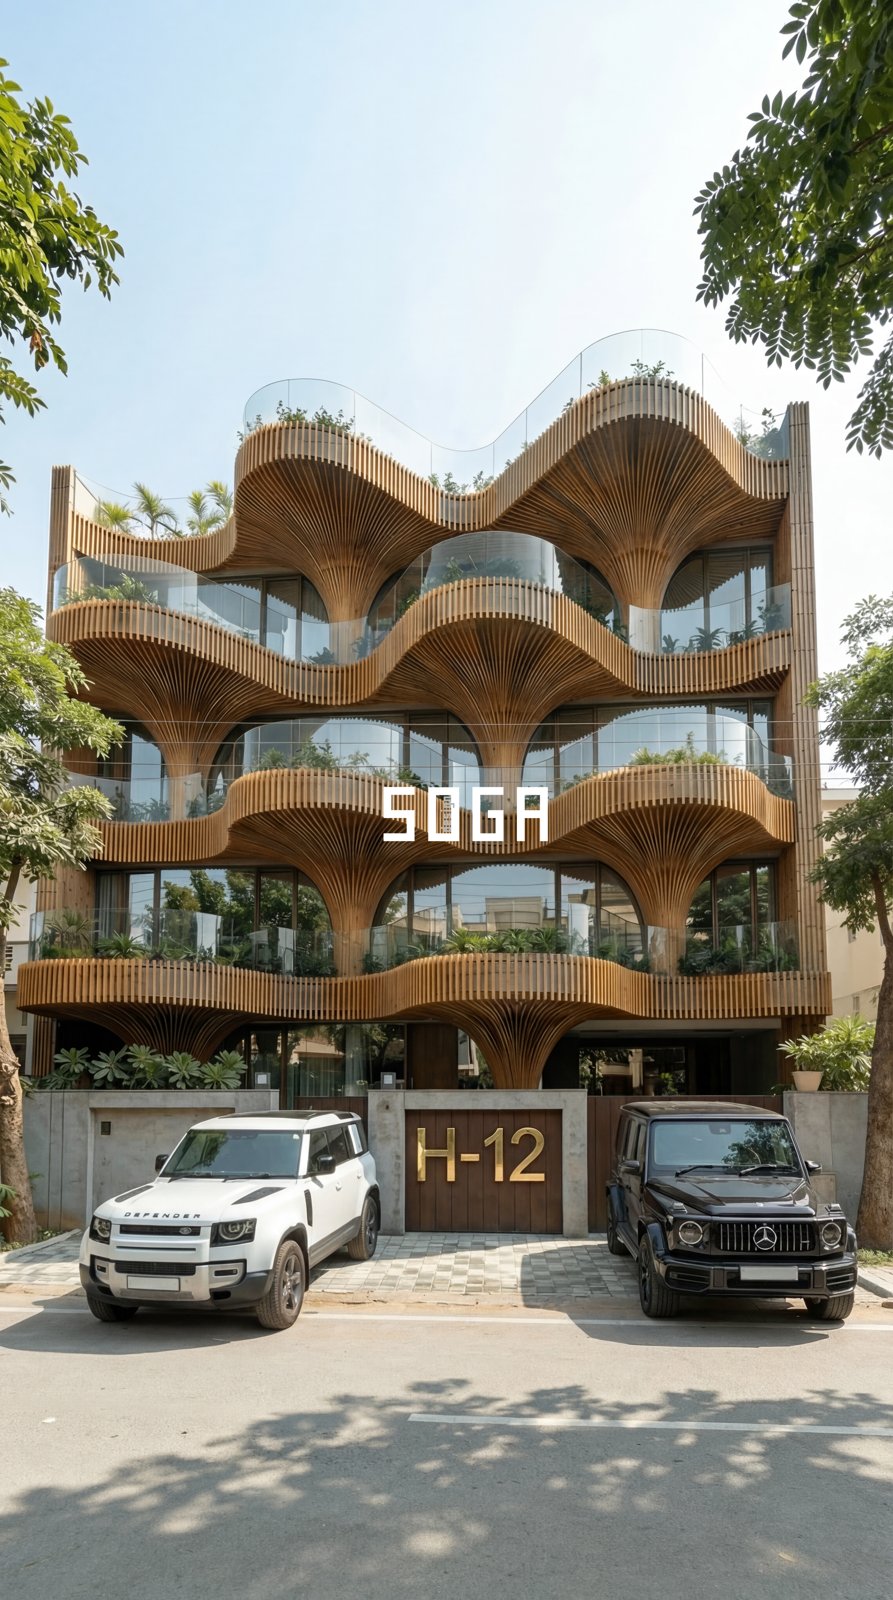
5. The Modern Arch: Heritage Geometry Without the Pastiche
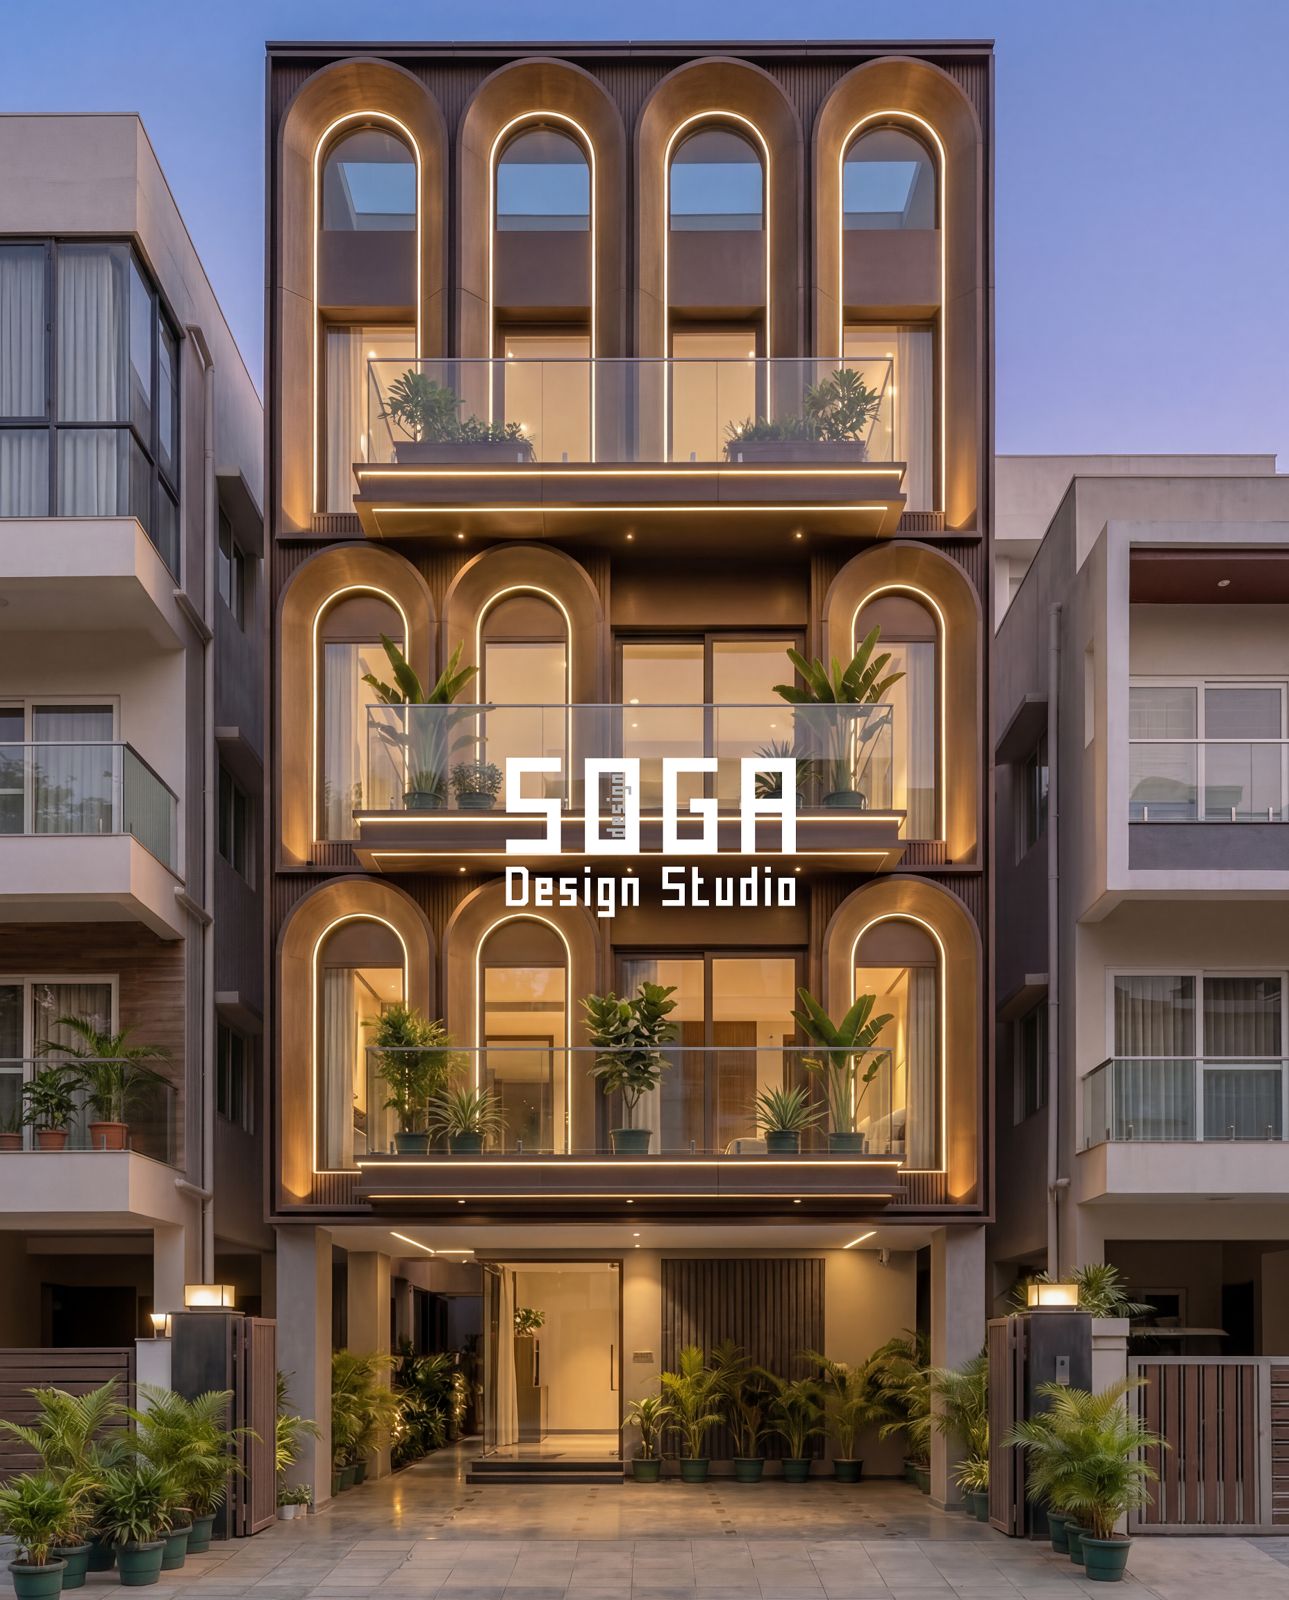
The arch is having a moment in Indian residential design, and most of the time it is applied as decoration – a curved band stuck onto a flat wall. Here it is the depth of the reveal that carries it. Each bay is a deep frame, and the arch is the shape of the opening through it, not a motif glued to the surface.
The arch reads from the road and shades the glass only when it is built as a 200 mm deep rib, not a plaster outline: a pointed arch built as a rib at slab-edge depth.
The concealed cove light sits inside that reveal, which is why the geometry survives after dark. Anyone can light a facade from the ground; lighting it from within its own depth is what makes the arch read as a real opening at night rather than a painted shape.
| At a glance | What it means on site |
|---|---|
| What it is | Deep arched reveals forming the balcony bays |
| How it is built | Framed reveal boxes with the arch profile cut into the returns |
| Best suited to | Elevations that need warmth and a strong night identity |
| Finish | Warm metallic or wood-shade returns, concealed cove lighting in the reveal |
The trade-off: Arches date faster than orthogonal frames when the proportion is even slightly off – too squat and it reads as a shopfront. And external cove lighting needs properly IP-rated fittings with a maintenance route to reach them, or you get dark segments within a couple of years and the whole night elevation falls apart.
6. Curved Balcony Cutouts: Designing the Night Elevation on Purpose
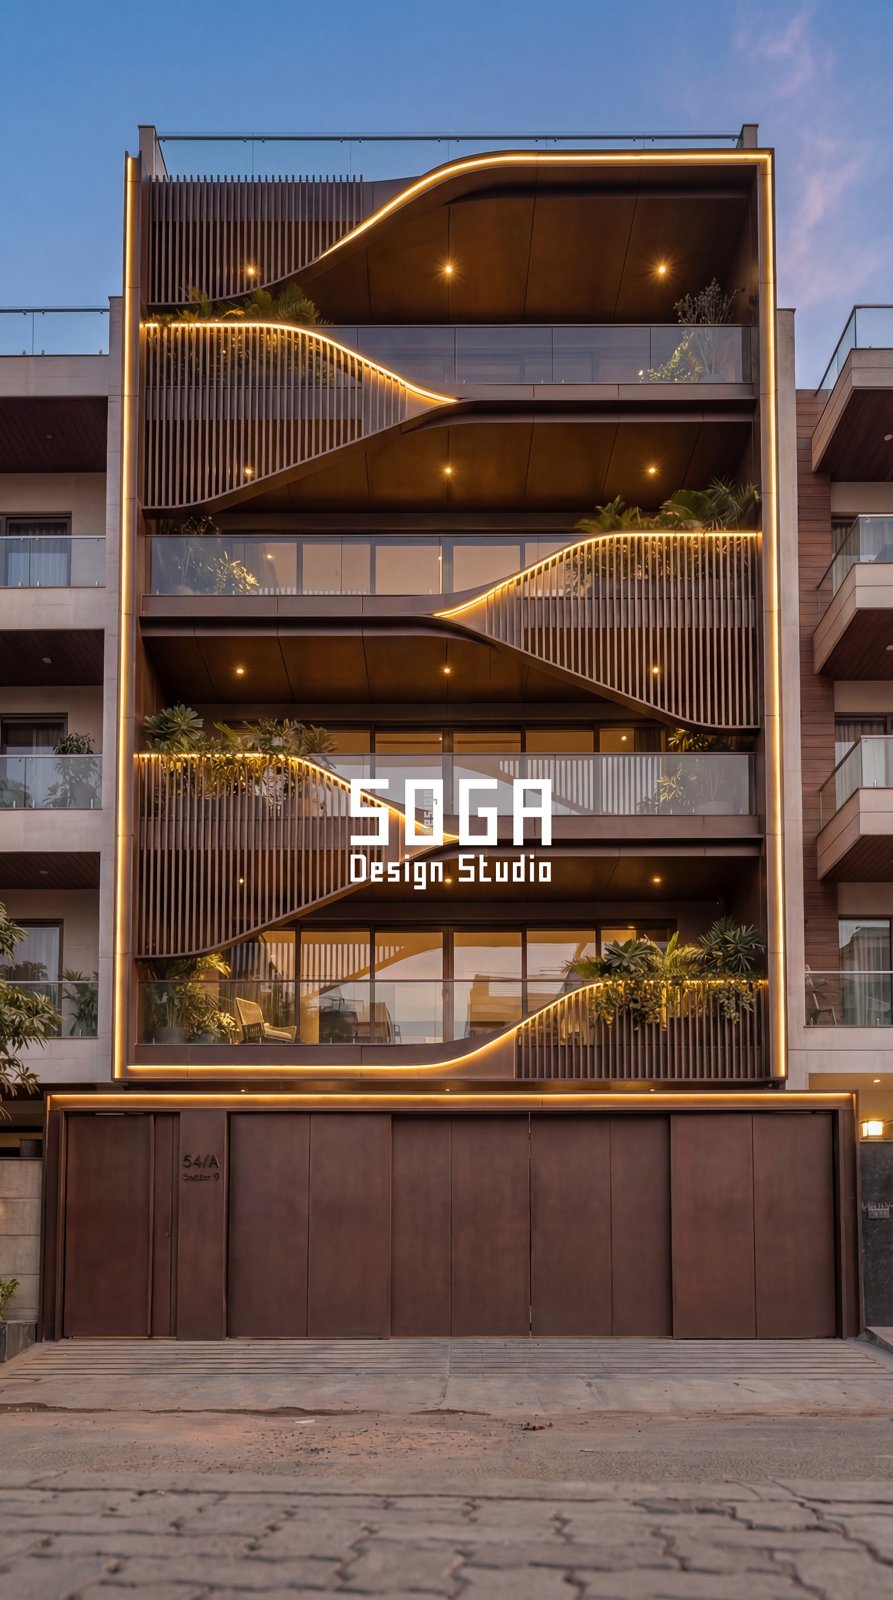
By day this is a bronze-tone plane with sweeping cutouts and deep shadow. By night the cutout edge becomes a drawn line, because the light is housed in the edge itself rather than washed across the surface.
That is the whole idea: one geometry doing two completely different jobs depending on the hour. It is worth planning deliberately, because on a narrow urban street your elevation is seen far more often in the evening – when people are actually home – than in flat midday light.
| At a glance | What it means on site |
|---|---|
| What it is | Solid planes with sweeping curved openings at each balcony |
| How it is built | Cut-and-folded panel edges detailed as a concealed light housing |
| Best suited to | Houses on streets where the evening view is the one that matters |
| Finish | Bronze-tone metal with warm linear lighting in the cut edge |
The trade-off: The night image lives entirely on the lighting continuing to work. That means a driver location you can actually reach, a spare-parts specification agreed at handover, and a budget line for relamping – otherwise the elevation degrades one dark segment at a time, and a half-lit facade looks worse than an unlit one.
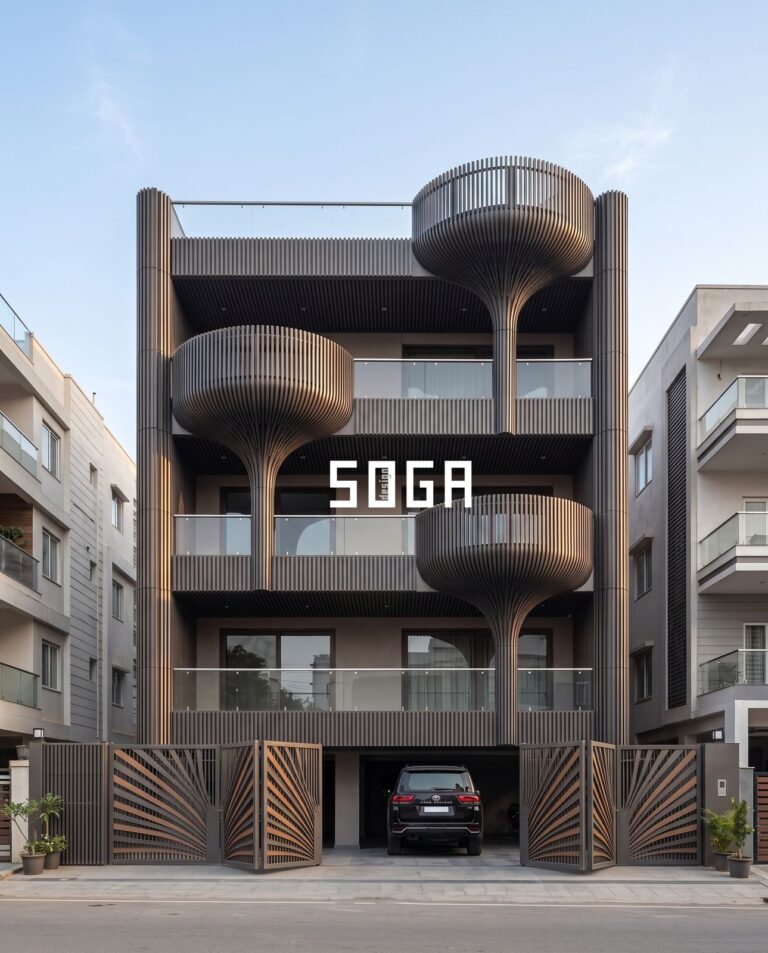
7. Fluted Fins and Drum Balconies: Privacy on a Tight Street
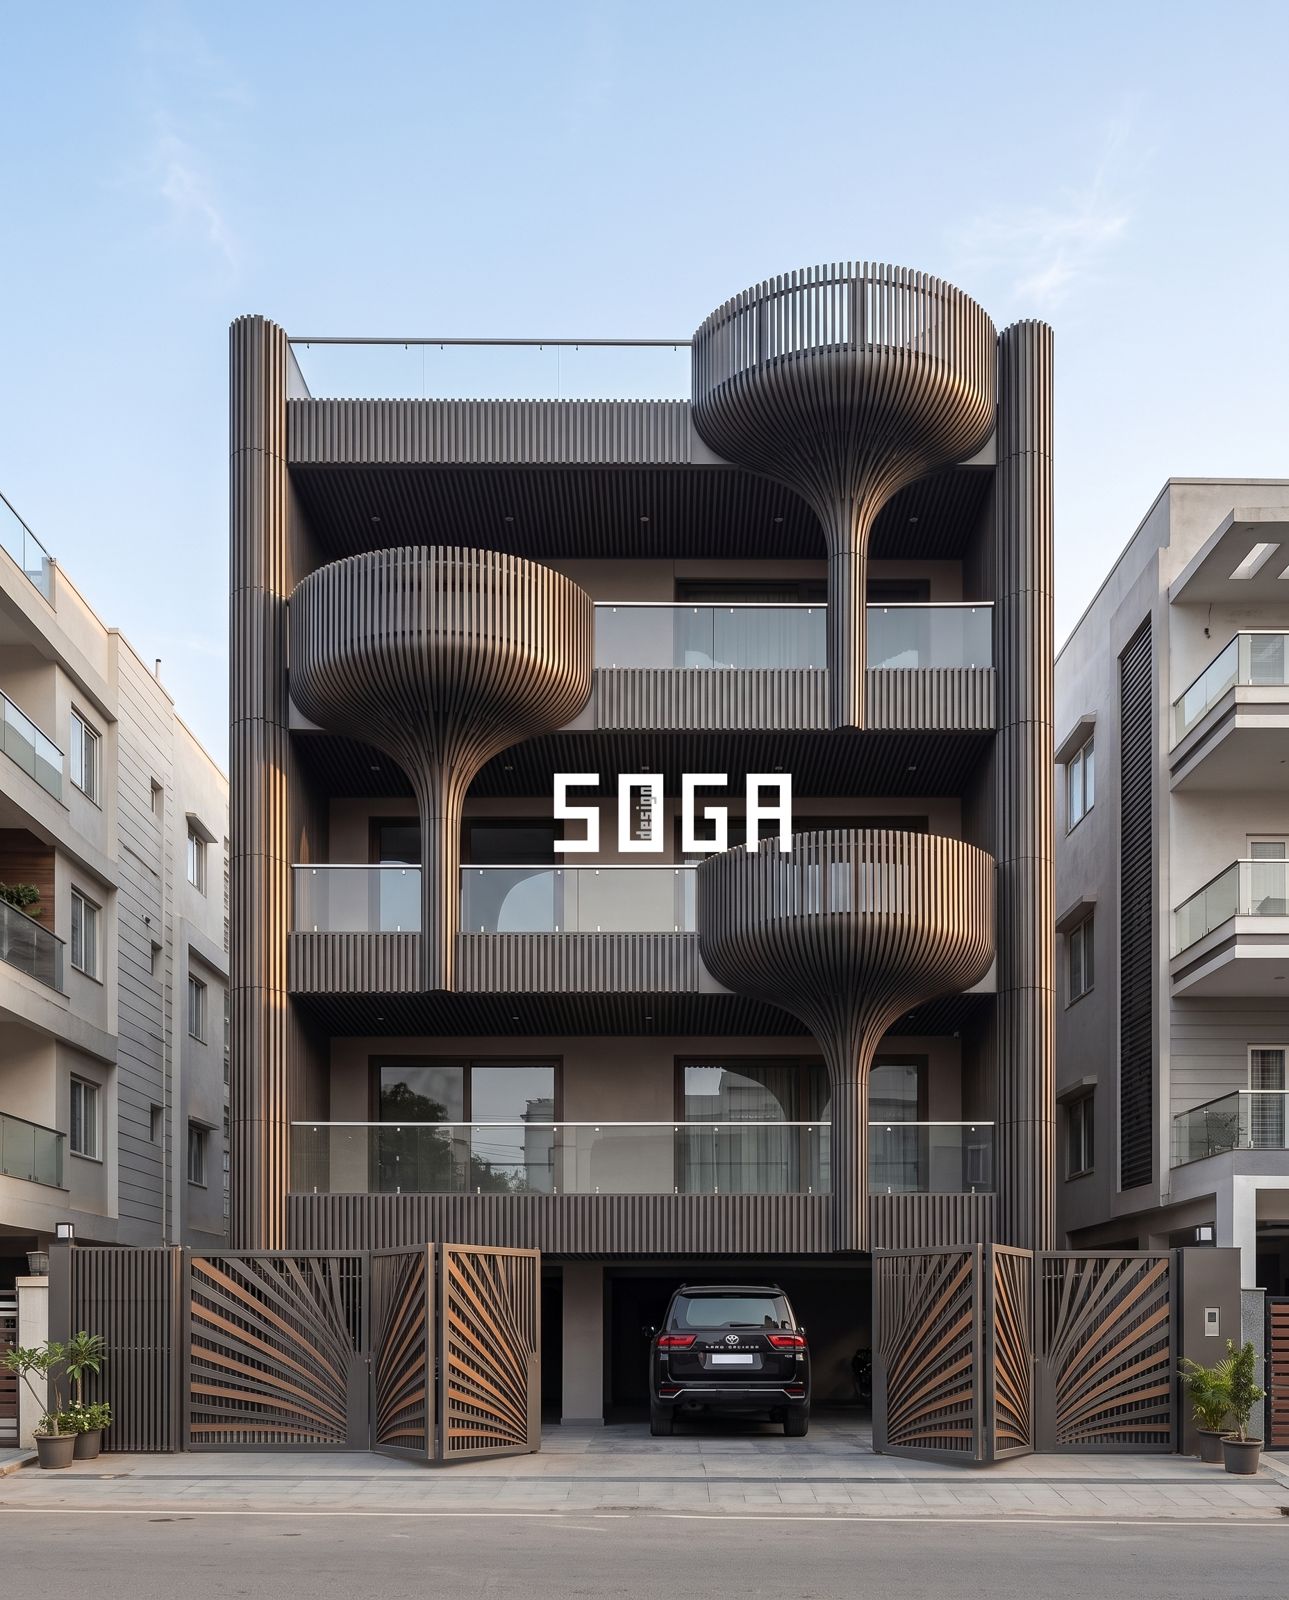
On a narrow street the balcony is the problem nobody names: it is the one part of the house where you are visible from the road at eye level, so most owners simply stop using it. The drum solves that by wrapping the balcony in a screen that blocks the horizontal sightline while leaving it fully open to the sky.
The fluting around it is doing quiet technical work too. Vertical flutes hide panel joints, and they break the apparent scale of a tall narrow block, so a G+3 on a 30 ft frontage reads as a considered object rather than a slab.
| At a glance | What it means on site |
|---|---|
| What it is | Cylindrical screened balcony pods on a fluted fin facade |
| How it is built | Curved fin sections forming the drum, fixed off the slab edge |
| Best suited to | Narrow plots on busy streets where balconies currently go unused |
| Finish | Dark fluted metal, often with a wood-shade accent at the entrance |
The trade-off: The drum eats into usable balcony width – you gain a balcony you will actually sit in, but it is a smaller one. The flute profile also holds road dust on a busy street, so factor a wash cycle in rather than assuming a dark finish hides it.
8. The Single-Material Wrap: One Texture, Rounded Corners
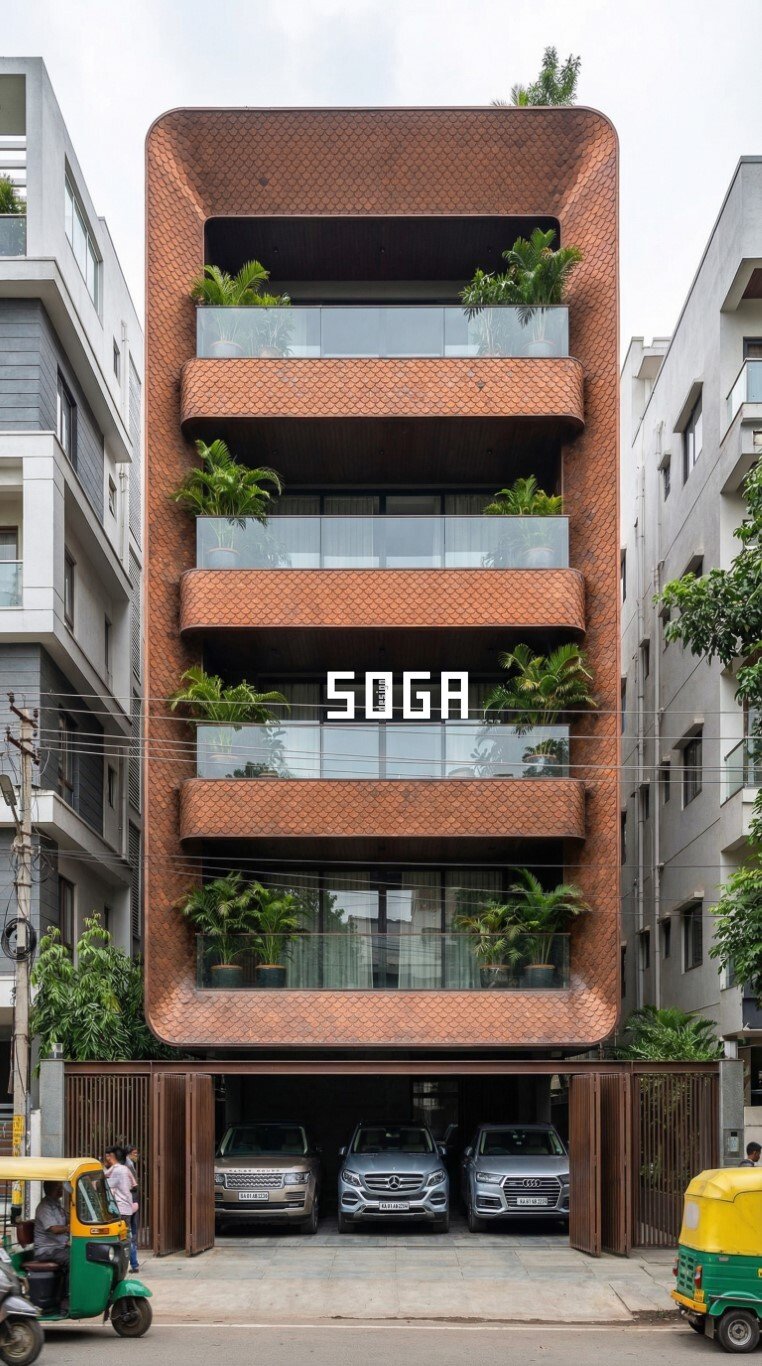
Everything else in this article adds an element to the building. This one removes them. A single embossed skin wraps the whole block, the corners are turned rather than mitred, and the floor lines disappear – so instead of four stacked storeys you read one object.
It is the most disciplined option here and the hardest to get right, because there is nowhere to hide. With one material and one texture doing all the work, the entire elevation rests on the quality of the finish and the accuracy of the joints.
| At a glance | What it means on site |
|---|---|
| What it is | A continuous embossed metal skin wrapping the full block |
| How it is built | One repeating panel type, with curved cassettes forming the corners |
| Best suited to | Owners who want a quiet, monolithic building rather than a feature facade |
| Finish | Copper or bronze-tone embossed texture, consistent across every face |
The trade-off: One material everywhere means the whole facade lives or dies on finish consistency, so batch-matching matters and a single replaced panel years later may never quite match. The rounded corner cassettes are also the most expensive pieces on the job – typically the item that moves this from mid-range to premium.
What Each Elevation System Costs in India (2026)
Indicative installed rates we use for early budgeting, ordered from the cheapest route to the most involved. They are ranges rather than figures because access, height and finish grade move them significantly – treat them as a way to sanity-check a quote, not as a quotation.
| Elevation system | Indicative installed rate |
|---|---|
| Plaster and paint (the baseline everything is compared to) | Rs 150 – 350 per sq ft |
| ACP / composite panel cladding | Rs 250 – 350 per sq ft |
| Stone or tile cladding | Rs 400 – 1,200 per sq ft |
| Powder-coated or anodised metal fin and louver screens | Rs 800 – 2,500 per sq ft |
| Faceted or folded metal panel systems | Rs 1,200 – 2,800 per sq ft |
| GFRC and precast curved elements | Rs 1,200 – 2,600 per sq ft |
| Terracotta baguette and clay rainscreen | Rs 1,400 – 2,900 per sq ft |
The single biggest lever in that table is not the material – it is how many different panel types your design needs. One repeating panel with a varying bracket lands near the bottom of a band; a facade where every piece is unique lands above the top of it. Curved and corner pieces are the next biggest factor, then height and access, then finish grade. Architectural lighting, where a design depends on it, is a separate budget line and should be priced as one from the start rather than value-engineered out at the end.
How to Choose Between These on Your Own Plot
Start with five facts about the site rather than with a mood board. First, your frontage width: under about 30 ft, choose one strong move and let it carry the whole elevation – two competing systems on a narrow face read as clutter. Second, which way the front faces: a west or south-west face needs real shading depth, which points to a screen or a baguette system rather than a flat panel. Third, how close and how high the neighbours are, because that decides whether privacy screening is a nice-to-have or the entire brief. Fourth, whether you park under the building, since a stilt takes away the ground storey and the elevation has to start at first floor level and still feel anchored. Fifth, and the one most people skip: how much maintenance you will realistically do. A planted or lit elevation is a commitment, not a purchase. Answer those five honestly and the list above narrows to two options, which is a far easier decision than choosing from a gallery of a thousand.
The one service item that ruins a G+3 street elevation is the condenser stack — here is how we hide AC outdoor units on the house facade without derating them.
Before the panel is sized, it is worth knowing what wind pressure a G+4 facade panel has to carry — 0.86 to 1.41 kPa in the field, and up to 3.1 kPa inside the corner strip.
Orientation stops helping once both side walls are party walls. ventilating a G+3 from one open face is a separate problem, and the depth limit that comes with it is set out post by post.
Related Reading
- Parametric facade design in India
- Clay and terracotta facade design in India
- Fluid curved concrete facades in India
- Facade design cost across India, Dubai and Singapore
- How to choose a facade design company in India
- Parametric Facades in Architecture: All You Need to Know
- Revolutionizing Architectural Design: AI-Optimized Parametric Facades for India’s Hot Climates
Frequently Asked Questions
What is the difference between elevation design and facade design?
In practice they describe the same thing from two directions. Indian homeowners and builders say elevation, meaning the designed front face of the house. Architects and the construction industry say facade, meaning the whole building envelope – all faces, plus how it handles sun, rain and heat. If you are searching for elevation design you are usually after the visible front; if a consultant talks about facade engineering they are including the parts you cannot see, like the sub-frame, the cavity and the drainage.
How much does a G+3 or G+4 house elevation cost in India in 2026?
It depends almost entirely on the system. Plaster and paint sits at roughly Rs 150-350 per sq ft, ACP around Rs 250-350, stone or tile cladding Rs 400-1,200, metal fin and louver screens Rs 800-2,500, and terracotta or faceted metal systems Rs 1,400-2,900 per sq ft installed. For a typical G+4 on a 30 ft frontage the elevation area is modest, so the jump from a basic to a designed skin is usually a smaller absolute number than owners expect – it is the number of distinct panel types, not the material, that decides where in the band you land.
Which elevation design works best on a narrow 25-30 ft plot?
One move, done well. On a narrow frontage the most common mistake is combining three systems on one face, which reads as clutter from the twenty-foot viewing distance a narrow street actually gives you. A single vertical screen, one folded-panel field, or one strong balcony geometry will look considered where a mix will not. Shallow depth matters too, since the setback rarely allows much projection – faceted panels at 100-200 mm are often the practical answer.
Can a new elevation be added to a house that is already built?
Yes, and on a G+3 or G+4 it is usually easier than owners fear, because the new skin is carried on its own frame rather than by the old wall. On a narrow plot, though, the deciding factor is rarely structural – it is access. With neighbours a few feet away on both sides there is often nowhere to stand a scaffold except the front, so the whole installation has to be sequenced off a single face, and panel sizes get chosen by what will fit up that face rather than by what is cheapest to fabricate. Two other things to settle before you commit: whether the added depth still leaves you inside your setback line, and how the stilt parking keeps working while the front of the house is occupied by the installation.
Which elevation material needs the least maintenance in Indian cities?
Fired clay and good-quality anodised or powder-coated metal are the least demanding, because in both cases the colour is either fired through the body or bonded into the coating rather than painted on top. Painted render is the highest-maintenance option, typically wanting a repaint every five to seven years. In any city with real dust or coastal salt, an annual wash-down does more for the life of an elevation than any premium material upgrade.
How long does a designed metal or clay elevation take to fabricate and install?
It varies with the system, the panel count and how many pieces are unique, and it is one of the numbers we prefer to give against real drawings rather than as a rule of thumb – ask us for a programme once the design is fixed. What is worth knowing early is the sequence: design and engineering first, then shop drawings and approval, then fabrication, and only then site installation. Site time is usually the shortest part, which surprises most owners.
Get an Elevation Designed for Your Actual Plot
Send us your plot frontage, the number of floors, the direction the front face looks and a photo of the street, and we will come back with an elevation concept drawn to those constraints, a buildable panel strategy and an itemised estimate per sq ft. SOGA Design Studio is a facade and elevation design studio based in Gurugram, working across India and with owners in Dubai and Singapore. The first consultation is free and carries no obligation – write to [email protected].